
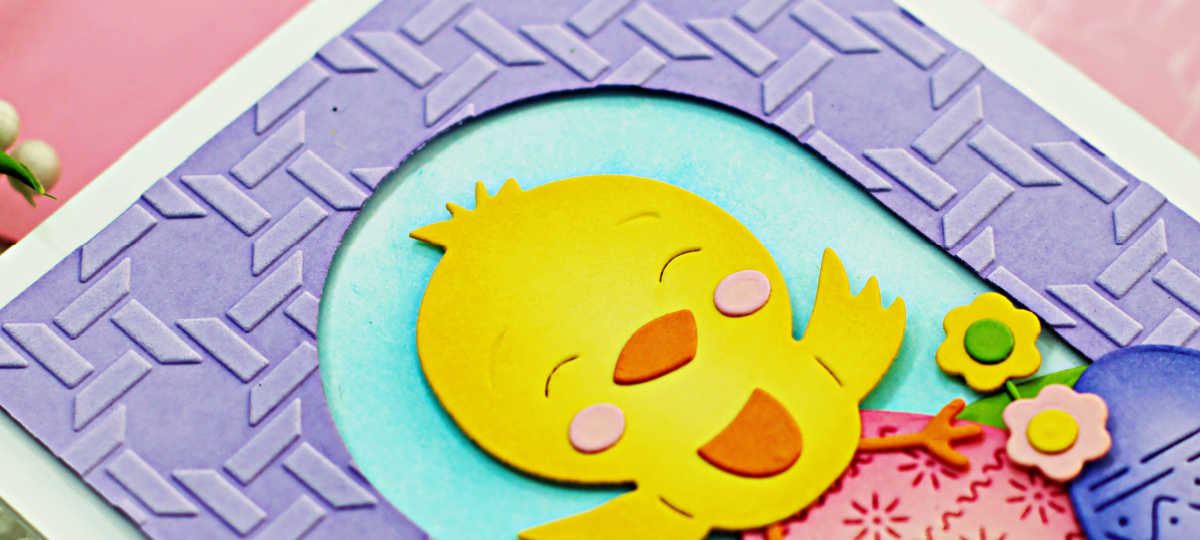
Hey card-making friends. Today I’m Introducing Pip. This adorable little chick is the Deluxe Caboodle of the Month Bonus Die. So, if you subscribe to the Spellbinders Deluxe Caboodle to get all the clubs, you are going to meet Pip in person. I decided to combine Pip with the Clear Stamp and Die Set of the Month for Feb, Spring Smiles, along with the Embossing Folder Club, Wicker Basket, because hey, that’s a perfect fit for an Easter card right?
Then of course I needed the eggs, flowers and carrot from the Large Die of the Month Club too…..All put together to create this adorable card.
Affiliate links are used throughout this post at no additional cost to you. This allows me to keep bringing you content. I appreciate your support.
Products Used:
- Spring Smiles – Clear Stamp and Die Set Feb 2025
- Wicker Basket – Embossing Folder of the Month Feb 2025
- Dancin Hoppy bunnies Everywhere – Large Die of the Month Feb 2025
- Deluxe Caboodle Bonus – PIP
- Essential Arches Dies
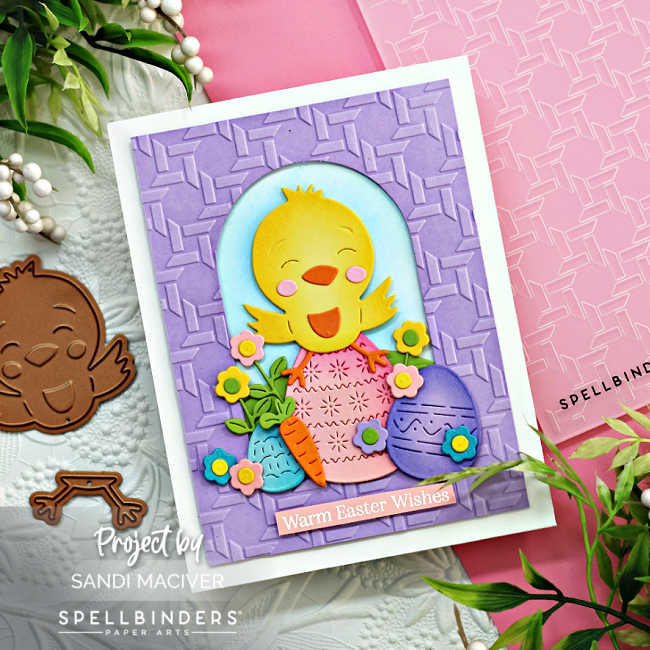
How to create the Introducing Pip hand made card:
Start with a top folding A2 sized white card base 4-1/4″ x 11″, score and fold at 5-1/2″.
Next, cut a piece of Purple Mist cardstock 3-3/4″ x 5″. Die cut an arch in the center using the 7th from center arch die. Emboss with the Wicker Basket Embossing Folder.
TIP – I find spraying the paper with water first, helps to break down the fibers and gives you a deeper embossed image without the paper tearing.
Then, using a large blending brush, lightly cover the embossed image with Violet ink, this helps the embossing show up.

Introducing Pip – Embellishing the card.
Die cut Pip and all the other elements from colored card stock.
Next, using small blending brushes, and Citrine, Ocean, Violet, and Peony inks from Simon Says Stamp, ink blend the edges to add depth and color to the pieces.
Then, attach the embossed card front to the card base with foam tape. Using foam squares, attach the pink egg in the center, then Pip on top, and use the remaining elements to decorate around them.
Finally, white heat emboss the sentiment onto a scrap of the Pink Sand cardstock to attach to the bottom center of the card.
Visit my Card Making PDF Gallery for 350+ more card ideas.

Card Making Supplies used for the Introducing Pip Card:
Here are the products I used today. Compensated affiliate links used were available at no cost to you.
Clicking on a thumbnail link and shopping provides me with a small commission (at no additional cost to you), which supports my website and allows me to continue bringing you new projects and videos. Thank you for your support. Affiliate and product disclosures are found on my disclosure page. All products were personally purchased except for Spellbinders monthly clubs which were provided/sponsored by the company. As always, I was not paid to do this post. I only use and recommend products I love. Click on the icons below each product picture to go to my favorite stores.


-
-
- Follow me on INSTAGRAM
- Join 38,000+ following me on PINTEREST
- Subscribe to my YOUTUBE Channel
- Follow me on FACEBOOK
- Follow my SOURDOUGH BREAD JOURNEY – over on my The Sour Strawberry BLOG
- JOIN my STAMP OBSESSION Facebook Group
- Check out my FREE PDF Gallery for over 350+ Card Making Tutorials
- How to make a SLIMLINE CARD – Info PAGE
- Do you like to stitch on cards? Then join our NEW FACEBOOK GROUP
-

– LOTS of great Paper Crafting Sales and New Releases going on this week – Check them out here
 Shop my Favorite Brands with my affiliate links
If you do place an order using my affiliate links (and thank you if you do) – please email me with the $$ amount before tax and shipping, and which company it was placed through, along with your mailing address and I’ll send you a hand made card as my thank you. [email protected]
The reason I ask for that specific info is the system that tracks the sales only gives us a dollar amount and company name, we do not know who made the sale.
That card is way too cute Sandi! Love the little chick, perfect Easter colors too! 🙂
thank you Amy
Really cute Easter card and lovely spring colours!
thank you Sharon
Sweet card, Sandi! Clever idea to ink the embossed background.
Thank you Gayle, it really does highlight the embossing and really makes it pop
Adorable my friend! I love it!
thanks so much Natasha
such a cutie and a perfect spring filled Easter card! love!
aw, thank you Lisa