
Hi card making friends, welcome back. I’m doing a bit of catch up today so I’m combing a couple of sets of BetterPress Products to share with you today. My computer is still in sickbay, waiting for a part, so I’m humping along slowly on this old beast and it’s been heartburn believe me, LOL.
Anyway, playing with the BetterPress machine was a nice and well needed distraction.
PLEASE NOTE: This post contains affiliate links. See below for my full disclosure.

I love this BetterPress machine for many reasons. It’s easy to use, it provides amazing results and you can do so many different things with it. I have a couple of different techniques to share with you today. The first two cards are from a new release September 10th, More BetterPress Christmas.

How to create the Spellbinders BetterPress Cards Card #1
This card is a messy watercolor. The BetterPress ink is waterproof, so you can press onto watercolor paper and go at it, which I did with my Zig Markers.
Start by inking the Poinsettia with the Black BetterPress Ink and pressing onto a piece of watercolor paper cut at 3-3/4″ x 5″.
Next, use Zig markers to add colors and to watercolor the background.
Markers Used: 36, 33, 42, 60, 72, 24, 21, 22, 47, 43, and 50
Then, add a black mat that is 4″ x 5-1/4″, and then a card front in Waterfall, 4-1/4″ x 5-1/2″. Add all this to a white top folding A2 sized card base.
Finally, press the sentiment with Wild Berry Ink, die cut and add to the top right corner.
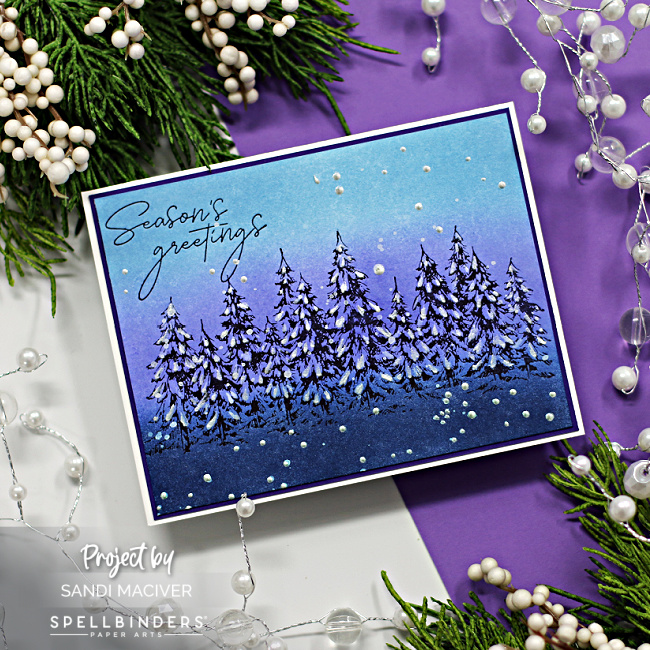
Create the Spellbinders BetterPress Cards card #2
Start by ink blending 3 colors of Gina K Designs Ink across a piece of the BetterPress white card stock. Powder Blue, Wild Wisteria, and In the Navy.
Next, Press the evergreens into the paper with the Black Ink.
Repeat to add the sentiment in the top left corner.
trim the piece down to 4″ x 5-1/4″, add to a purple mat, and then to a white A2 card base.
Splatter with white paint. I also used Liquid Pearls in White Opal to add snow to the trees.

Spellbinders BetterPress Cards, Card #3 –
This is the September BetterPress Monthly Club – Corner Sunflowers – and it’s FABULOUS.
Because I’m so far behind, I decided to do an ink blended background using Gina K Designs Inks in: Cherry Red, Tangerine Twists and Wild Dandelion.
Next, I used black ink to press the image. Then I attached it to a top folding white A2 sized card base.
Finally, I splattered it with white acrylic ink and then added the sentiment also pressed with the black ink.

Visit my Card Making PDF Gallery for 350+ more card ideas

Card Making Supplies used for the Spellbinders BetterPress Cards:
Here are the products I used today. Compensated affiliate links used where available at no cost to you.
Clicking on a thumbnail link and shopping provides me with a small commission which supports my website and allows me to continue bringing you new projects and videos. Thank you for your support. Affiliate and product disclosure are found on my disclosure page. All products were personally purchased except for Spellbinders BetterPress Products which were provided/sponsored by the company. As always, I was not paid to do this post. I only use and recommend products I love. Click on the icons below each product picture to go to my favorite stores.


-
- Follow me on INSTAGRAM
- Join 38,000+ following me on PINTEREST
- Subscribe to my YOUTUBE Channel
- Follow me on FACEBOOK
- JOIN my STAMP OBSESSION Facebook Group
- Check out my FREE PDF Gallery for over 350+ Card Making Tutorials
- How to make a SLIMLINE CARD – Info PAGE

– LOTS of great Paper Crafting Sales and New Releases going on this week – Check them out here
 Shop my Favorite Brands
Beautiful cards Sandi! Your ink blending is amazing and I love the pink poinsettia! 🙂
Thanks so much Amy
Sandi,
These are all stunners! SO Gorgeous!! Somehow I missed this SB release?!?! Good thing I saw your post…. TFS !
Lori S in PA
haha, it just came out on the 10th, beautiful new plates to play with
These really are awesome, Sandi Love the colour combos for each one
and the different images!
Thank you Sharon, I know, three completely different looks, I was playing with what techniques I could use with the BetterPrress
Wow Samdi I Love these cards. Beautiful colors. I am now excited on playing with my Better press machine. What paper did you use?
Have you tried hot foiling with the dies?
Hi Marian: Thank you. I used watercolor paper for the poinsettia one, and the Betterpress paper for the other two. Nope have not tried foiling yet. My computer crashed last week, so I’m really behind on my design team stuff
Each one is ABSOLUTELY gorgeous! The blending on card 3 is a WOW!!!!!!
thank you, I didn’t have time to color, so ink blending was much faster, LOL