
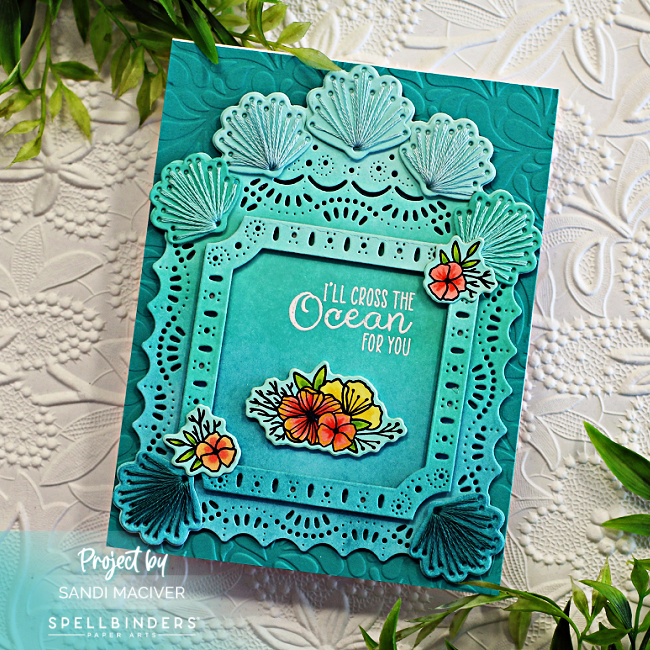
Hey crafty friends, thanks for stopping in today. It’s the 6th of the month so that means the sign up for the NEW SPELLBINDERS MONTHLY CARD KITS is open. I thought I would tease you a little with one I just created combining 3 of the new kits. Spellbinders Stitched Shell Card Front Stitched Monthly Kit is the main focus of today’s card. To it, I added copic colored pieces from the Clear Stamp and Die Set of the Month called Water You Up To, and the Embossing Folder for June 2023 which is Splish Splash.
PLEASE NOTE: This post contains affiliate links. See below for my full disclosure

I decided to combine some ink blending into this too, creating an ombre ink blend of Ocean Breeze, Aquamarine and Tidal Pond inks from Pink Fresh. I LOVE this combination and it goes perfectly with this month’s theme don’t you think?
To that, I also stitched the shells in ombre using DMC Embroidery Cotton in 3811, 964 and 3848.

How to create the Spellbinders Stitched Shell Card Front Card:
Start with a 4-1/4″ x 5-1/2″ piece of Teal Topaz and emboss it with the new Splish Splash Embossing folder. Attach it to the front of a top folding White A2 sized card base.
Next, using two white 4-1/4 x 5-1/2″ panels, Ombre ink blend both of them. Cut the first one with the background filigree die and set aside.
Then, die Cut the smaller square from the second one and then cut the sea shell stitched overlays from the scraps.
Adding the Stitching to the Spellbinders Stitched Shell Card Front Card:
Do a straight stitch with the embroidery cotton, 3 in the light color, two in the medium and dark colors.
Next, use liquid glue to attach them to the die cut filigree base before attaching the base to the card front with Foam Squares to add dimension.
Then, cut the smaller square out of another piece of Teal Topaz scrap and glue it to the back of the ombre one to give it a bit of height. Add it to the center of the filigree piece also with foam squares.
Place the piece into the Misti and set up the sentiment in the top right corner of the box. Stamp and heat emboss with white embossing powder.
Then, stamp the florals from the Water You Up To Clear stamp and die set. Color with copic markers, then cut them out with the coordinating dies.
Finally, attach the florals to the card as show.
COPICS USED:
Flowers: R20, R21, R05 and Yellows: Y11, Y15, Y17, Green YG03 – color the background with B00 to blend with the ink blending color.
I’ve created a downloadable PDF file for you with all the instructions, photo and supply list. You can save it in your computer or print it off to help you recreate the card.

 Never Miss a Post – Subscribe to my blog posts.
Visit my Card Making PDF Gallery for 350+ more card ideas

Card Making Supplies used for the Spellbinders Stitched Shell Card Front Card:
Here are the products I used today. Compensated affiliate links used where available at no cost to you.
Clicking on a thumbnail link and shopping provides me with a small commission which supports my website and allows me to continue bringing you new projects and videos. Thank you for your support. Affiliate and product disclosure are found on my disclosure page. All products were personally purchased except for Spellbinders Large Die of the Month Kit which were provided/sponsored by the company. As always, I was not paid to do this post. I only use and recommend products I love. Click on the icons below each product picture to go to my favorite stores.


– LOTS of great Paper Crafting Sales and New Releases going on this week – Check them out here
 Shop my Favorite Brands
Just beautiful Sandi! The colors are perfect and I love those die cuts! 🙂
Thanks Amy, It’s a super cool die set this month I loved stitching it
Absolutely gorgeous! Great stitching , super colours and embossing!
Just so full of details!
Thank you Sharon, I had a blast with this one, loved every minute of creating it
Gorgeous Sandi, love the dark teal with those super pretty flowers!
Thanks Lisa, I’m totally in love with the stitched die set this month
Just gorgeous! I love how you combined the kits!