
Hi card making friends. Well it’s the 6th of the month so that means NEW SPELLBINDERS CLUBS are live and available for sign up. I’m starting the month off with the Spellbinders Enchanted Stitched Mushrooms or, the Small Die of the Month Club Kit. There are 6 little pieces to stitch this month, but they are small, and all require the long stitch so they work up quickly to create a fun card.
PLEASE NOTE: This post contains affiliate links. See below for my full disclosure.
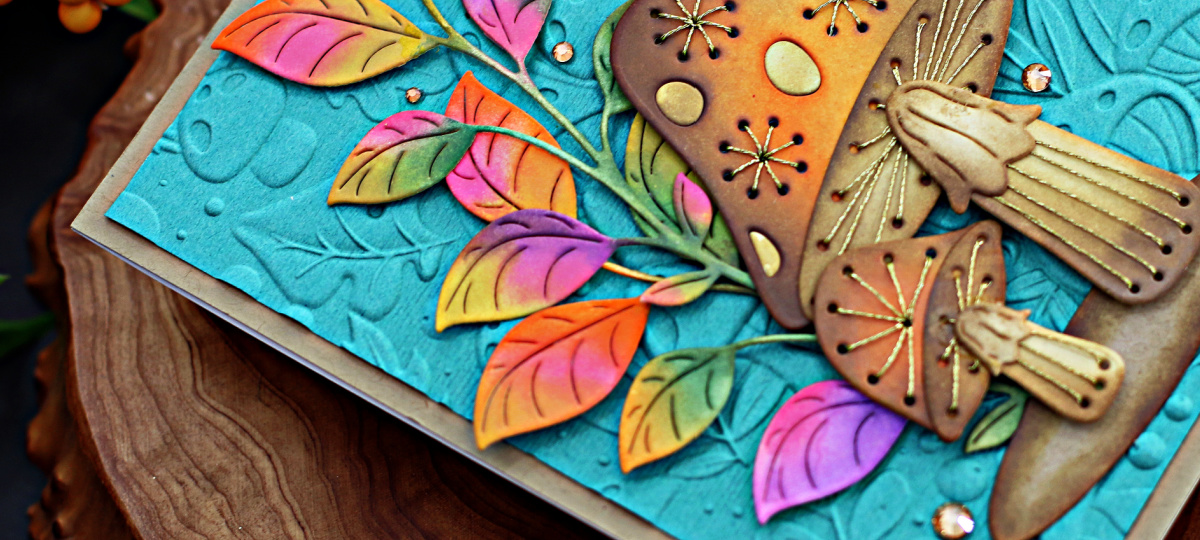
Our weather has changed here with fall starting to show her colors, so I decided to follow suit with my card. Lots of beautiful bright leaves and earthy brown mushrooms. I backed it with a beautiful piece of teal cardstock embossed with this month’s 3D Embossing Folder – Mushroom Harvest.

How to create the Spellbinders Enchanted Stitched Mushrooms.
Starting with a half sheet of white cardstock, cut the leaves twice and all the mushroom pieces.
Next, using Distress Oxide Inks and blending brushes, color all the mushroom pieces, starting with the light colors and working through to the dark.
Ink used for mushrooms:
Fossilized Amber, Spiced Marmalade, Ripe Persimmon, Brushed Corduroy, Gathered Twigs and Ground Expresso
Next, use the Gold DMC Thread and #24 needles from the Stitch Along Add On Kit to stitch all the pieces before gluing them together.

Spellbinders Enchanted Stitched Mushrooms – coloring the leaves.
Start by using Distress Oxide Inks for the leaves:
Wilted Violet, Picked Raspberry, Crushed Olive, Rustic Wilderness, Fossilized Amber.
Start by using small blending brushes to add pockets of colors to the leaves and then blending them to remove any lines.
Next, add the greens to the stems. I’m in love with how these leaves turned out, you know me and bright colors, LOL.
Then, create a white top folding A2 sized card base, 4-1/4″ x 11″, score and fold at 5-1/2″. Cut a piece of Portobella 4-1/4″ x 1/2 and glue down for the card front.
Next, Use the 3D-Mushroom Harvest embossing folder and emboss the teal card stock cut to 4″ x 5-1/4″ and use tear tape to attach it to the card front.
Finally, use small pieces of foam squares to attach the leaves first and then the mushrooms to the card.
Embellish with the sentiment cut from mirror gold cardstock and Gold Mix Color Essentials Gems. the gold highlights mirror the stitching and add a bit of glimmer to the card.

Check out all the NEW SEPTEMBER CLUBS and sign up for your favorites –

And if your in love with all the clubs, check out the VALUE CLUB options, where club kits are combined with big discounts and one small shipping fee

Visit my Card Making PDF Gallery for 350+ more card ideas

Card Making Supplies used for the Spellbinders Enchanted Stitched Mushrooms card:
Here are the products I used today. Compensated affiliate links used where available at no cost to you.
Clicking on a thumbnail link and shopping provides me with a small commission which supports my website and allows me to continue bringing you new projects and videos. Thank you for your support. Affiliate and product disclosure are found on my disclosure page. All products were personally purchased except for Spellbinders Small Die of the month Kit and 3D Embossing Folder which were provided/sponsored by the company. As always, I was not paid to do this post. I only use and recommend products I love. Click on the icons below each product picture to go to my favorite stores.


-
- Follow me on INSTAGRAM
- Join 38,000+ following me on PINTEREST
- Subscribe to my YOUTUBE Channel
- Follow me on FACEBOOK
- JOIN my STAMP OBSESSION Facebook Group
- Check out my FREE PDF Gallery for over 350+ Card Making Tutorials
- How to make a SLIMLINE CARD – Info PAGE

– LOTS of great Paper Crafting Sales and New Releases going on this week – Check them out here
 Shop my Favorite Brands
Wow Sandi, this card is so pretty and the sparkle from the floss accent is just right. Thanks for the inspiration.
thank you Cynthia, I was really happy with how it turned out
I just love the colors you used for the leaves, they are so bright and cheery!
thank you Margaret, they make me happy too
That’s way too cute Sandi! Love the colors and the fun design! 🙂
thanks so much Amy
Superb, Sandi, and gorgeous colours, too!
Thank you Sharon, I had a blast with this one
ABSOLUTELY gorgeous!!!!!!!! Love 🧡🧡🧡🧡🧡🧡
thank you friend, I had a blast making it
Love this!❤️ This is stunning Sandi, perfection plus and the leaf colours are amazing.
thanks so much Annie