
Hello and welcome to the final day of STAMPtember 2023 and the Tim Holtz STAMPTEMBER STAMP SET release – Stamp set is sold out and no longer available.
It’s been a super crazy busy month with all the releases and it’s been so fun to see the reveal each day, I hope you enjoyed it. I think I may take a couple of days off, haha.
PLEASE NOTE: This post contains affiliate links. See below for my full disclosure.

I decided to make tags with today’s stamp set and boy did I have fun creating them.
I started by spraying the tags with Distress Mica Sprays in Wonderland, Frosty mint and juniper Berry.
Next, I used the stencils that came with the stamp set and some white Embossing Paste to add stars to the background of each tag.
Next, while I had the spray out, I sprayed some White Wrinkled Faux Silk Ribbon with the sprays so they would match perfectly.
Then, I stamped the images with Simon Says Stamp Intense Black Ink and colored them with Faber Castell Colored Pencils before cutting them out.


How to create the Tim Holtz STAMPtember Stamp Set tags: Rudolph
Start by running some of the stained ribbon through the tag hole and tying it off with black and white thread.
Next, use the Sizzix Holiday Greens Mini dies to add some die cut foliage to the bottom of the card.
Then, stamp and cut out the sentiment and attach over the foliage.
Finally, use foam squares to attach Rudolph to the tag. Then, use Glossy Accents on the ornaments and nose.

How to create the Tim Holtz STAMPtember Stamp Set tags: – Frosty:
Start by adding the ribbon at the top and then use Distress Grit Paste to create snow at the bottom (the snow takes forever to dry)
From the Big Tidings Die set, cut out the tree and star and attach to the top left side of the tag.
Then, use foam squares to attach frosty and the sentiment
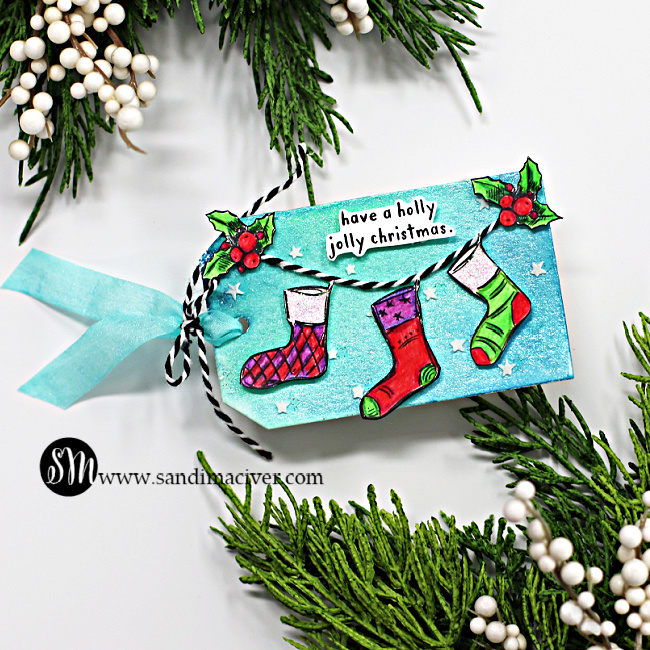
How to create the Tim Holtz STAMPtember Stamp Set tags: – Socks
The initial tag starts the same as the previous two.
Next, add a piece of the black and white string and over that glue the holly.
Then use foam squares to attach the colored socks.
Finally, use Stickles Crystal on the tops of the socks for some added bling.

Visit my Card Making PDF Gallery for 350+ more card ideas

Card Making Supplies used for the Tim Holtz STAMPtember Stamp Set tags:
Here are the products I used today. Compensated affiliate links used where available at no cost to you.
Clicking on a thumbnail link and shopping provides me with a small commission which supports my website and allows me to continue bringing you new projects and videos. Thank you for your support. Affiliate and product disclosure are found on my disclosure page. All products were personally purchased except for Simon Says Stamp Stamptember products which were provided/sponsored by the company. As always, I was not paid to do this post. I only use and recommend products I love. Click on the icons below each product picture to go to my favorite stores.


-
- Follow me on INSTAGRAM
- Join 38,000+ following me on PINTEREST
- Subscribe to my YOUTUBE Channel
- Follow me on FACEBOOK
- JOIN my STAMP OBSESSION Facebook Group
- Check out my FREE PDF Gallery for over 350+ Card Making Tutorials
- How to make a SLIMLINE CARD – Info PAGE

– LOTS of great Paper Crafting Sales and New Releases going on this week – Check them out here
 Shop my Favorite Brands
So cute Sandi! Love the fun holiday tags! 🙂
These are so cute, Sandi!
These are a complete and total delight, Sandi! I MUST get my mica sprays out and use them TOMORROW!!
Lori S in PA
I know, I need to use mine more too
I always love your colorful designs! Also, your fussy cutting! How did you do those antlers without ending up with them all bent up!?! So great!
haha, thank you Kim, it took some work, believe you me, LOL