
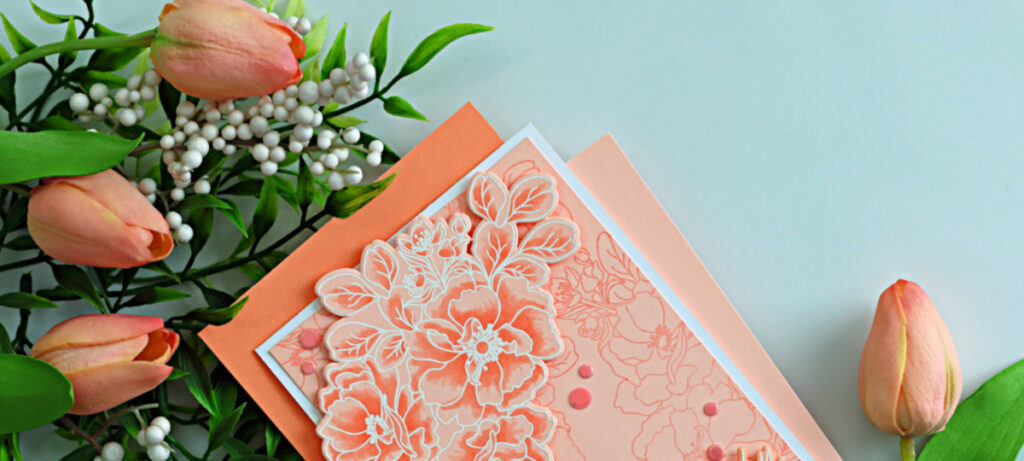
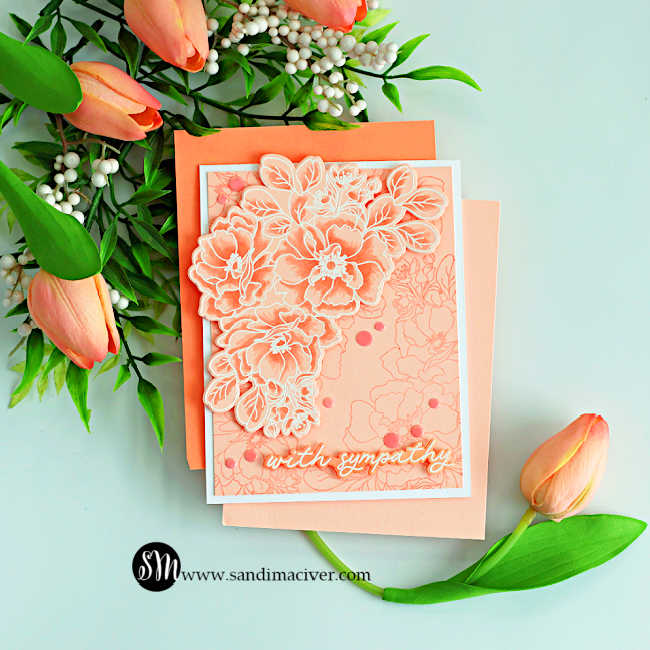
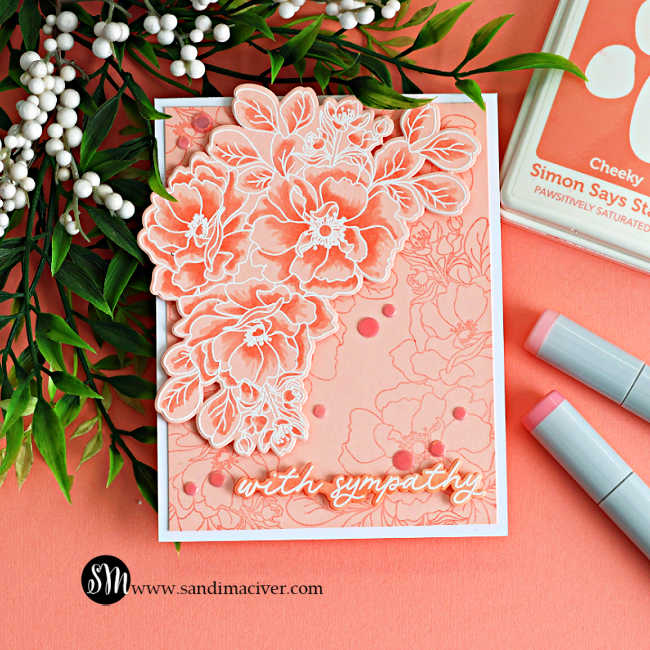
Welcome back, friends! Today I’m toning things down a little and sharing how to create a monochromatic Wild Rose sympathy card. I needed a sympathy card for a friend, and monochromatic designs are always so soft and elegant. I paired this beautiful apricot cardstock with white heat embossing, a touch of Copic coloring, and some subtle background stamping to create a gentle, heartfelt design.
In my designer box this month, Simon Says Stamp sent a multi-color pack of cardstock, and this apricot shade immediately caught my eye. Then this morning, I opened an email from Altenew and saw a stunning peach-toned card by my sweet friend Michelle Short. The light bulb went on! I asked if she minded if I was inspired by her design, and she graciously said yes. I just love how we can inspire one another in this creative community.
Alright, let’s dive in–I’ll walk you through the easy steps to create this soft and elegant monochromatic sympathy card.
Products Used for todays Monochromatic Wild Rose Sympathy Card:
- Wild Rose Stamp and Die Set
Opal Rainbow Sequins - White Embossing Powder
- Copic Markers: R20 – R21
Apricot Cardstock
Steps to create the Monochromatic Sympathy Card:
1 – Create the Card Base
Start by creating a white A2-sized, top-folding card base (4-1/4″ x 11″ score and fold at 5-1/2″). This clean white base allows the monochromatic sympathy card design to really shine.
2 – Stamp the Background
Next, cut an apricot panel to 4″ x 5-1/4″. Place it inside your Misti and using Cheeky ink, stamp the larger floral image in the Wild Rose Stamp set three times, to cover the panel. This creates a soft, tone-on-tone background that enhances the monochromatic sympathy card look. Adhere the panel to the card front.

3 – Heat Emboss and Color the Florals
Stamp the same floral image onto a second 4-1/4″ x 5-1/2″ apricot panel using VersaMark Ink, then heat emboss with white embossing powder.
Add depth and dimension using Copic Markers R20 and R21, gently shading the flowers and leaves to maintain the soft monochromatic effect. Die cut the image using the coordinating dies.
Pro-Tip While heat embossing, use the leftover scrap to stamp and emboss your sentiment, then die cut it to match. I also ink blended the sentiment with the Cheeky Ink to make it stand out a bit more at the bottom of the card.
4 – Assemble the Card
Use foam squares to attach the floral cluster to the top left of the card for added dimension. place the sentiment in the bottom right to balance out the design.
5 – Add Embellishments
Finish your monochromatic sympathy card with Opal rainbow Sequins. For this design, dig through the mix to find the soft apricot tones that complement the palette beautifully.
Final Thoughts:
This monochromatic sympathy card is soft, elegant, and easy to create. The gentle apricot tones paired with white embossing create a heartfelt design that’s perfect for sending comfort and support to a friend.


Never Miss a Cardmaking Tutorial
Subscribe to my blog and get the latest cardmaking ideas, tutorials, and inspiration delivered straight to your inbox — plus access to exclusive content and updates you won’t want to miss!

Visit my YouTube channel for 270+ cardmaking tutorials, techniques, and creative ideas to inspire your next project
Cardmaking Supplies Used:
Here are the supplies I used to create today’s How to Create A Monochromatic Rose Sympathy Card .
Many of the links below are compensated affiliate links. This means if you click through and make a purchase, I may receive a small commission at no additional cost to you.
These commissions help support my website and allow me to continue sharing cardmaking tutorials, videos, and inspiration. I truly appreciate your support.
All products were personally purchased unless otherwise noted. Simon Says Stamp In My Heart products were provided by the company for design purposes.
You can find my full affiliate disclosure on my disclosure page.
Click the icons below each product to shop my favorite stores.
Let’s Connect & Get Inspired
Follow along for more cardmaking ideas, techniques, and tutorials:
- Follow me on Instagram
- Join 38,800+ creatives on Pinterest
- Subscribe to my YouTube Channel
- Follow me on Facebook
- Join my Cardmaking Obsession Facebook Group
FREE Cardmaking Tutorials Library
Looking for more inspiration? Explore my FREE PDF GALLERY with 359+ cardmaking tutorials — packed with ideas, techniques, and step-by-step projects to spark your creativity.

Don’t Miss This Week’s Deals
Lot’s of great paper crafting sales and new releases happening now — check them out here!

Shop My Favorite Craft Brands
Browse my Go to Brands and supplies using my affiliate links.
Oh my goodness, that’s stunning Sandi! The monochromatic design is perfect! 🙂
thank you Amy
This is gorgeous, and such a pretty shade too!
thank you Sharon, yes, the color is beautiful
quite beautiful! thanks so much for sharing
thank you Debbie
Really gorgeous! I’ve never thought of using Copics on colored cardstock. I must try this. Thanks for sharing your process.
Thank you Janet, it actually works quite well
beautiful! love all the details especially the tone on tone stamping behind your flowers.
thank you Lisa