
It’s the 6th of the month, which means, NEW Spellbinders Club Kits are here – Yeah!
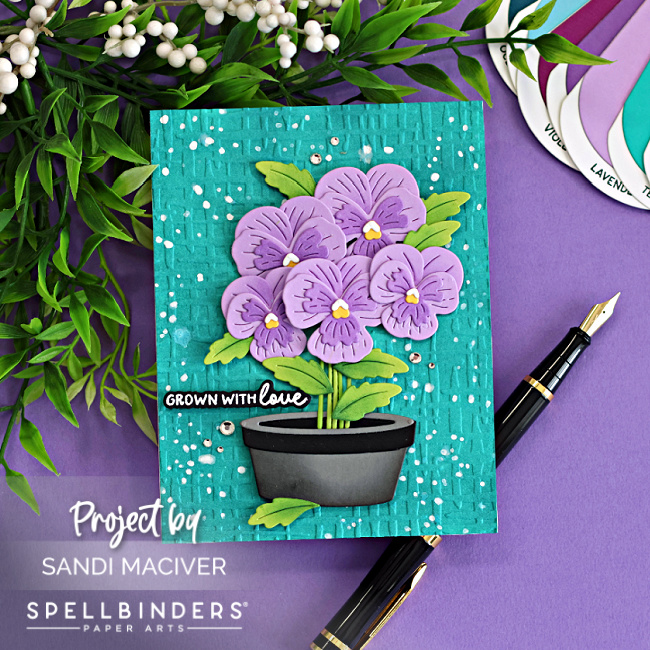
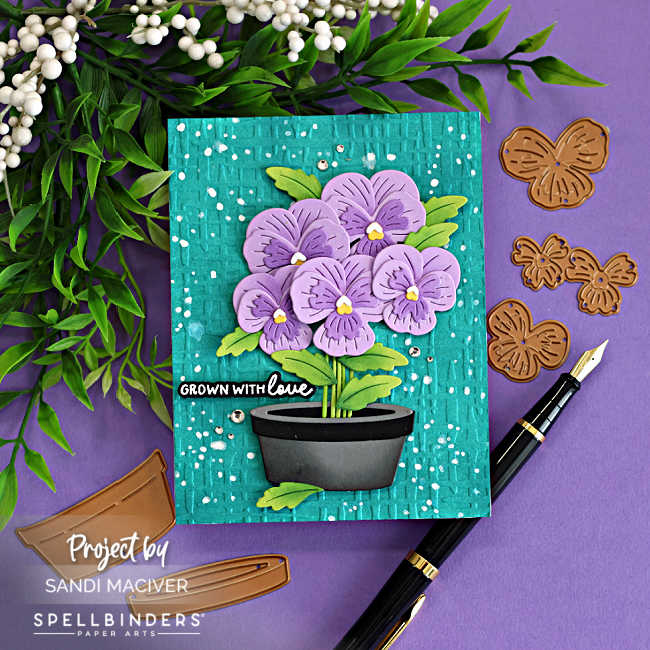
Today I’m sharing my Fresh Packed Floral card created using the Spellbinders Small Die of the Month (Pansy Seed Company), the Embossing Folder of the Month (Market Weave), and the Stamp and Die of the Month (Fresh Packed).
In this tutorial, I’ll walk you through how to:
- Layer the die-cut florals for dimension
- Ink blend and assemble the cute flower pot
- Create texture with embossing
- and finish it all off with a fun ink-splattered background.
Be sure to read all the way to the bottom–you won’t believe the BONUS GIFT included this month when you order the All-Clubs Crate. I can’t wait to start creating with it!

Here’s the supplies I used for today’s Fresh Paced Floral Card:
- Pansy Seed Company Dies – Spellbinders Small Die of the Month – April
- Fresh Packed – Spellbinders Clear Stamp and Die – April
- Market Weave – Spellbinders Embossing Club – April

How to create the Fresh Packed Floral Card | Spellbinders Small Die of the Month:
Create the card base:
Start by creating an A2-sized white card base (4-1/4″ x 11″, score and fold at 5-1/2″).
Next, cut a panel of Waterfall cardstock to 4-1/4″ x 5-1/2″. Using a large blending brush, blend Mist Ink around the edges, leaving the center slightly lighter for a soft glow.
Place it inside the Market Weave Embossing Folder and run it through your die cutting machine.
Then, place the panel in a splat box and splatter with white paint. Set aside to dry.
Once dry, adhere the panel tot he front of the card base and trim the edges for a clean finish.
PRO-TIP – When you emboss a card front, it often shrinks slightly. After adhering it to the card bas, use long scissors to trim the base so everything lines up perfectly.
Create the Flowers:
Cut both sizes of the pansies from Lavender cardstock. (three large and two small).
Ink blend the larger center pieces with Lilac Ink to deepen the color and add dimension. Lightly ink blend the back petals as well for extra depth.
For the small flower centers:
- Die cut the larger center piece from yellow cardstock.
- Die cut the tiny heart detail from white cardstock.
To assemble:
- Adhere the two back petals behind the main flower layer
- Attach the darker center layer using the etch guide lines
- Add the yellow center
- Finish with the tiny white heart detail at the top of the yellow center.
Create the Leaves:
Die cut five stems and multiple leaves from Rainforest Cardstock.
Ink blend the lower portion of the leaves with Rustic Wilderness Ink to create shadows and add interest.
Create the Flower Pot:
Die cut the flower pot pieces from Black and Anchor Cardstock. I used this combo on THIS CARD last week, and I really like how it turned out.
BEFORE Assembling, ink blend the left side and bottom of the main pot piece with VersaFine Clair Nocturne Ink to create realistic shading and depth.
Adhere the black rim to the top of the pot, followed by the narrower Anchor layer. Attach the black center piece from the back, gluing only the ends so the opening remains free to slide in the stems. I put 1/4 of a foam square on each end to accomplish this.
Heat emboss the Sentiment:
Stamp the sentiment in VersaMark Ink onto a scrap of black cardstock. Cover with white embossing powder, tap off the excess and heat set.
Die-cut using the coordinating die.
Assemble the Card:
Adhere the flower pot to the bottom of the card using thick foam squares.
Slide the stems in and secure both ends with glue.
Attach the flowers with foam squares, clustering them to hide the tops of the stems.
Add the leaves around the arrangement with foam squares, and place one leaf at the base of the pot for a natural, fallen look.
Adhere the sentiment to the left side above the pot using foam squares.
Finish with a sprinkle of Silver mix Color Essential Gems for a touch of sparkle.
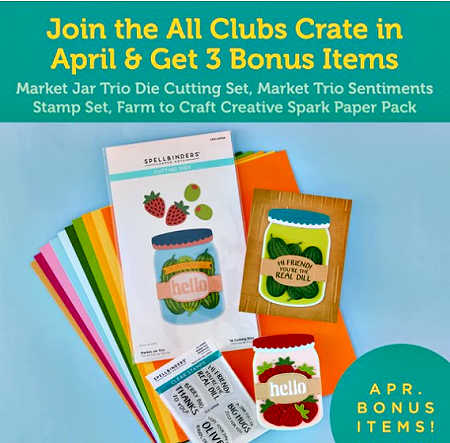
Spellbinders has pulled out all the stops for April with 3 BONUS ITEMS when you subscribe to the All-Clubs Crate>
you will receive:
- the Market Jar Trio Die Cutting Set,
- the Market Trio Sentiments Stamp Set
- and the Farm to Craft Creative Spark Paper Pack
Plus you save 56% from buying the clubs separately.
SUBSCRIBE TO THE ALL-CLUBS CRATE HERE


Never Miss a Cardmaking Tutorial
Subscribe to my blog and get the latest cardmaking ideas, tutorials, and inspiration delivered straight to your inbox — plus access to exclusive content and updates you won’t want to miss!

Visit my YouTube channel for 270+ cardmaking tutorials, techniques, and creative ideas to inspire your next project
Cardmaking Supplies Used:
Here are the supplies I used to create today’s Fresh Packed Floral Card.
Many of the links below are compensated affiliate links. This means if you click through and make a purchase, I may receive a small commission at no additional cost to you.
These commissions help support my website and allow me to continue sharing cardmaking tutorials, videos, and inspiration. I truly appreciate your support.
All products were personally purchased unless otherwise noted. Spellbinders April Club Kits were provided by the company for design purposes.
You can find my full affiliate disclosure on my disclosure page.
Click the icons below each product to shop my favorite stores.
Let’s Connect & Get Inspired
Follow along for more cardmaking ideas, techniques, and tutorials:
- Follow me on Instagram
- Join 38,800+ creatives on Pinterest
- Subscribe to my YouTube Channel
- Follow me on Facebook
- Join my Cardmaking Obsession Facebook Group
FREE Cardmaking Tutorials Library
Looking for more inspiration? Explore my FREE PDF GALLERY with 359+ cardmaking tutorials — packed with ideas, techniques, and step-by-step projects to spark your creativity.

Don’t Miss This Week’s Deals
Lot’s of great paper crafting sales and new releases happening now — check them out here!

Shop My Favorite Craft Brands
Browse my Go to Brands and supplies using my affiliate links.
Such a pretty card Sandi! Love those die cut flowers, perfect with the embossed background! 🙂
thank you Amy, I love pansies, so this was a fun one for me
This is a beauty, Sandi! Love the woven background and,
of course, the colours! They are gorgeous!
Thank you Sharon, I had a lot of fun with that one, LOL
Looks so realistic; like I could go pick some! The teal and lavender are so stunning together. Great art piece, Sandi!
Thank you Gayle, I was sure about the Teal and Lavender, but I was sure happy with it when I put them together, haha
The pansy card is beautiful! Please tell me, was it difficult to get the small pieces glued? My eyesight is not what it used to be, and I find myself enjoying detailed layering stencils more than tiny die cuts.
I am very tempted to enroll in the small die club after seeing your card!
Thank you Sharon. I have bad eyes too, but it wasn’t bad. I use my wax-tipped embellishment wand to pick up the pieces and that really helps. Only the tiny white piece on the flower center was really small
Thank you!
ABSOLUTELY gorgeous! Wow 💜
thank you friend
love it, the pansies are so pretty and look fab with the embossed panel behind.
thank you Lisa