
Hey cardmaking friends! I hope you’re having a fantastic week. I had such a blast creating these POP-UP Bridge Cards that I decided to turn on the camera and film the process. In this video, I’ll show you how to make a Bridge Card using products from the brand-new Spellbinders Country Christmas release. Just wait until you see the cowboy snowman—he’s my absolute favorite!
Giveaway: Visit my YouTube channel and Instagram, like, comment and subscribe, for a chance to win two of today’s cards. I’ll draw two winners on July 20th, one from each site, and notify the winners directly.
Card-making product affiliate links are used throughout this post at no additional cost to you. Your support enables me to continue providing you with content, and I genuinely appreciate your support!
Products used for the How to Make a Bridge Card:
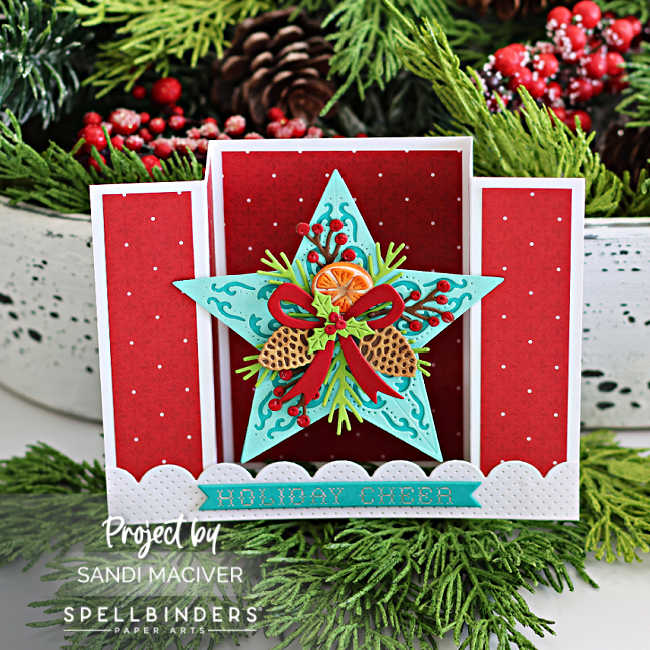
- Spellbinders Barn Star Wreath Dies
- Spellbinders Country Snowman Dies
- Country Christmas Embossing Folder
- July 2025 – Festive Press Plates (sentiments)
- Spellbinders Stitch and Dots Scallop Borders
- Merry Moments Paper Pad
How to Make a Bridge Card:
Card Base:
Cut a piece of cardstock to 4-1/4″ x 8″. Score at 1-1/4″, 2-1/2″, 5-1/2″, and 6-3/4″.
Patterned Paper:
Cut a panel to 4″ high by 6-3/4″ long. Then trim it into the following widths: 1″, 1″, 2-3/4″, 1″, and 1″.
PRO TIP: If you’re working with a 6″ x 6″ piece of patterned paper, here’s how to make it work:
-
Cut a strip to 4″ x 6″ with the 6″ edge at the top.
-
Cut this strip into sections: 1″, 1″, 1″, and 2-3/4″.
-
From the leftover 2″ strip, cut a 4″ long piece, turn it long ways and cut at 1″ to create the final panel.
Adhere all patterned paper panels to your card base.
Bridge Strip:
Use the Stitch and Dots Scallop Borders die set to create the bridge. Cut a scalloped strip approximately 6-1/4″ long. Glue it across the bottom of the card front, then snip off any overhang for a clean edge.
PRO TIP: Refer to the special instructions for the Snowman Cowboy card for extra bridge placement guidance.
Be sure to watch the video for step-by-step instructions on how to attach the bridge and keep the card square, so it folds flat and fits perfectly in an A2 envelope.
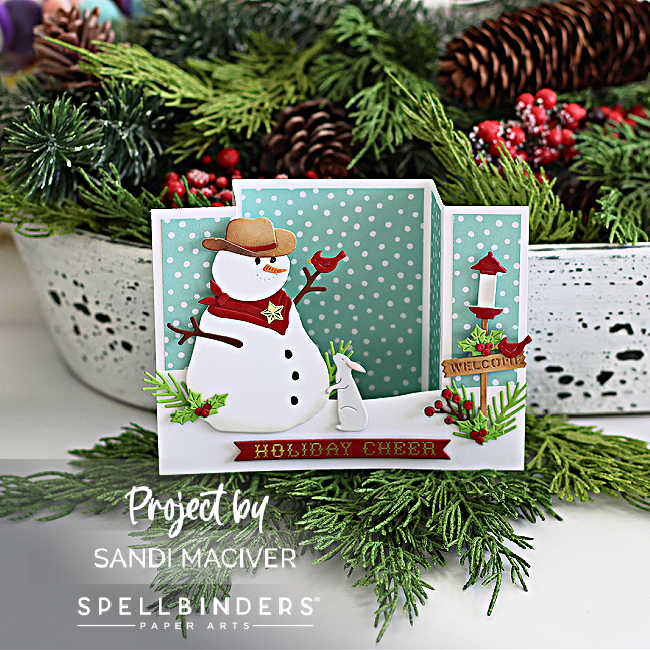
Tips for – How to Create a Bridge Card – Snowman Cowboy.
Begin by following the basic steps to create the card base.
To make the bridge:
Cut a piece of white cardstock to 3″ tall by 6-1/2″ long. Use scissors to trim the top edge into a gentle sloping hill. Attach the bridge strip to the card base using the same method as described above.
Next, die cut and assemble the scene:
-
Build the snowman, bunny, and bird feeder using the Country Snowman dies.
-
Add a bit of Pumice Stone Distress Oxide Ink to the bottom and left side of the snowman for soft shading.
-
Cut the bunny from Fog cardstock, adding a pink insert for the ear.
-
Create the sign and bird feeder pole from Kraft cardstock, and blend lightly with Gathered Twigs Distress Ink for depth and texture.
Add the sentiment:
Use the July 2025 Festive Press Plate with Gold Foil on red cardstock to create the “Holiday Cheer” sentiment strip.
Finish the card:
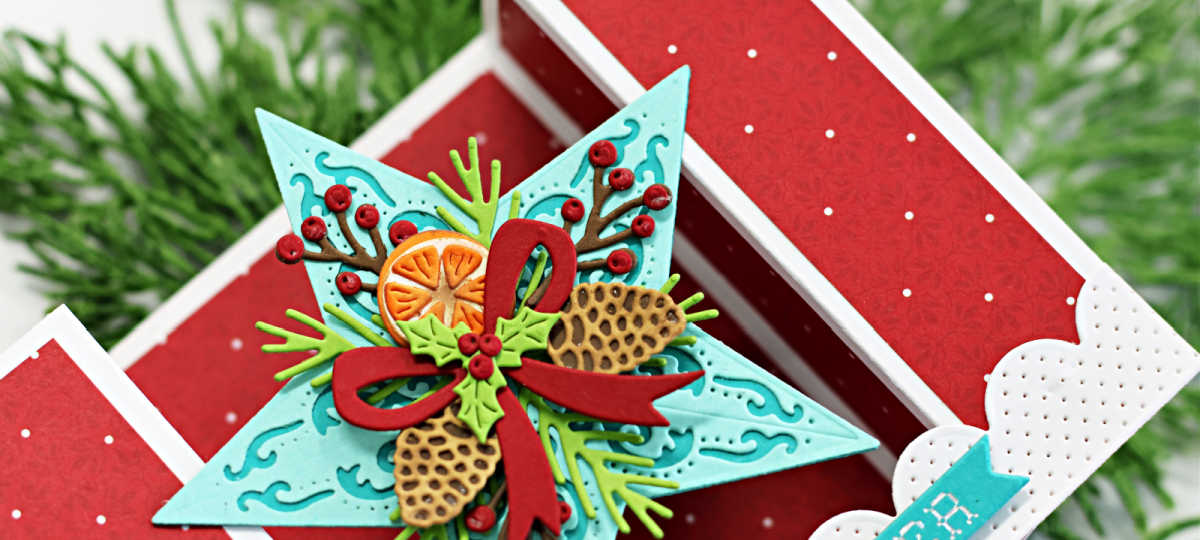
Embellish with festive greenery die-cut from the Barn Star Wreath die set to complete your holiday scene.
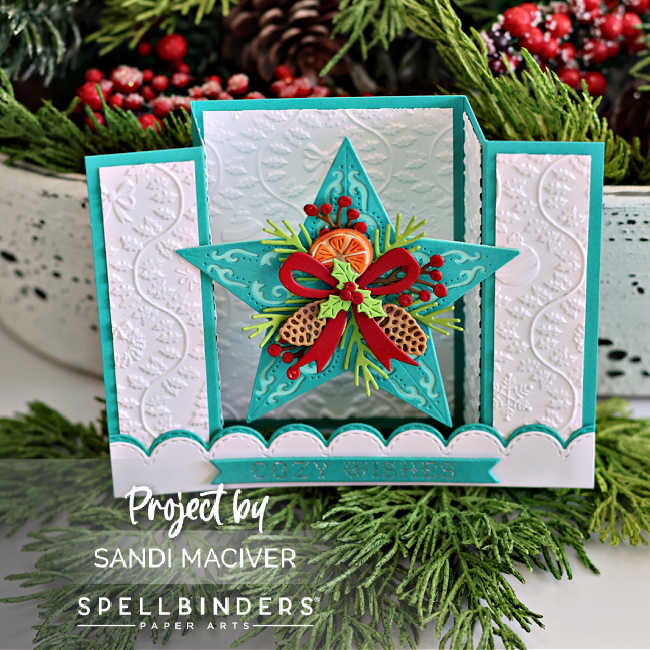
Using the Country Christmas Embossing Folder to create the card base:
As I mentioned in the video, if you don’t have much patterned paper—or if you prefer a clean white background—here’s an easy alternative.
Start by choosing a colored cardstock that complements your focal art piece image. For this card, I’m using teal. Score and fold your teal card base, then set it aside.
Next, cut a piece of white cardstock to 4″ x 6-3/4″. Trim this strip into the following widths: 1″, 1″, 2-3/4″, 1″, and 1″.
Place the center three panels inside your Country Christmas embossing folder, aligning them evenly, and emboss. Then repeat the process with the two outer panels.
PRO TIP: Pay close attention to the embossing pattern—try to duplicate the design for both panels for a cohesive look.
Use tear-tape to adhere the embossed pieces to the card base.
Finish by attaching the bridge and your focal art piece.
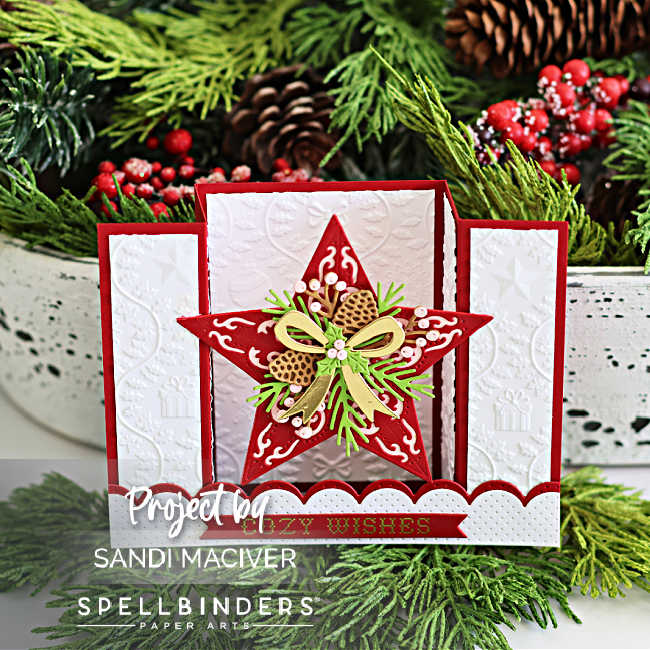
Try different colors:
How about red with pink highlights, and a gold bow.
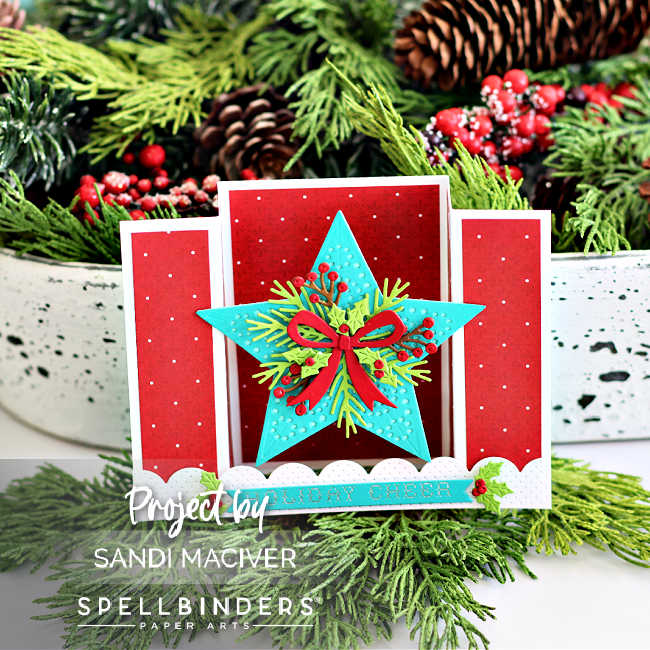
Try the other Die Pattern:
This card is a duplicate of card #1 with the exception that I used the dotted design dies to cut out my overlay. I also changed out how I decorated the front of the star and added little holly die cuts to each side of the sentiment.
Here’s today’s cardmaking video: How to Make a Bridge Card: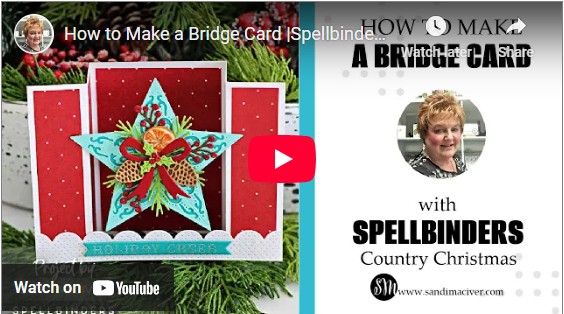
Click the button below to download the PDF with full written instructions for this card.


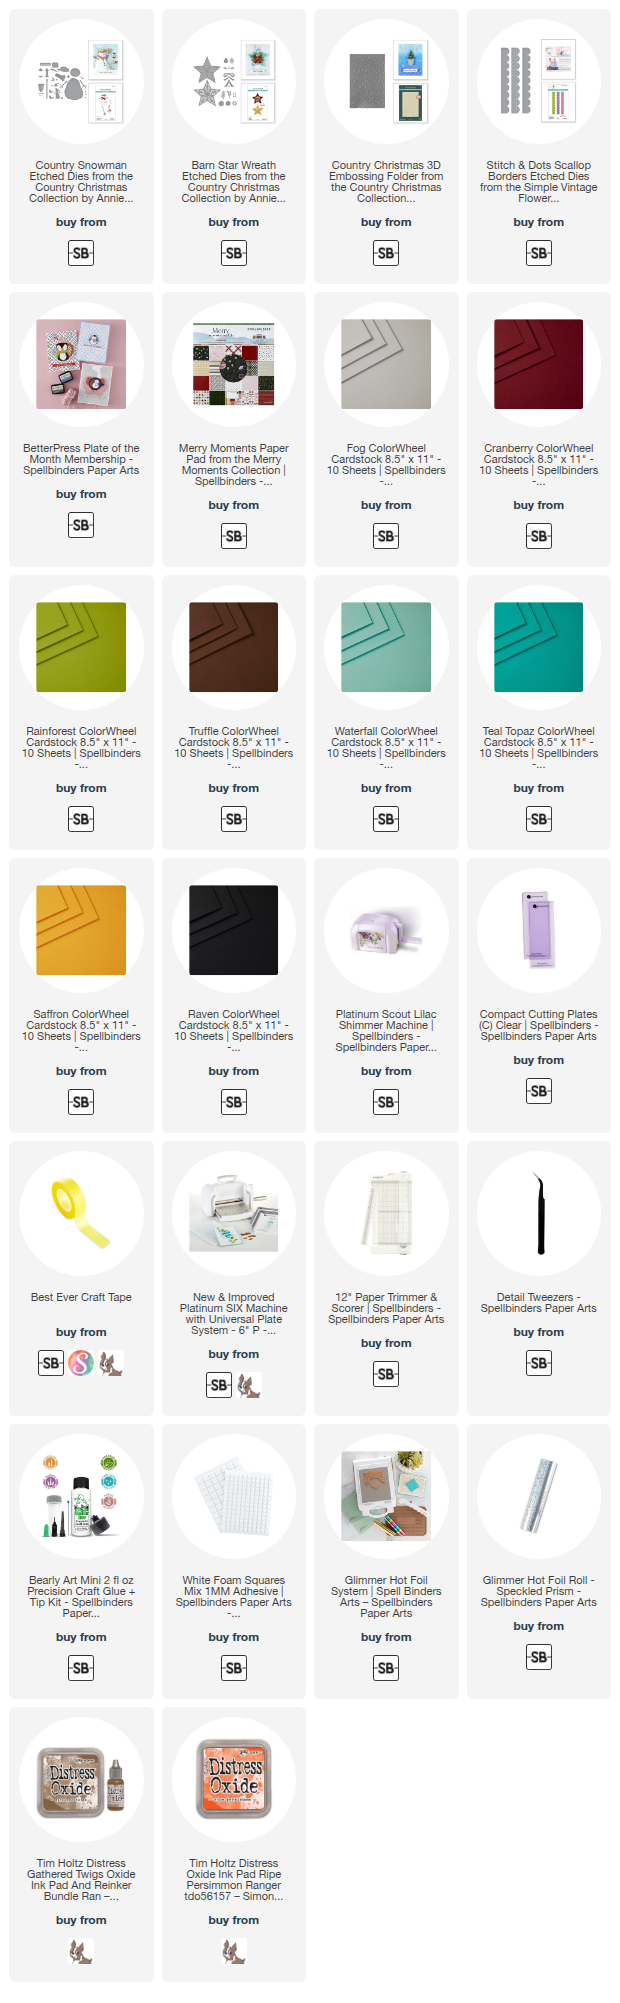
Card Making Supplies used for the How to Make a Bridge Card post:
Here are the products I used today. Compensated affiliate links used were available at no cost to you.
Clicking on a thumbnail link and shopping provides me with a small commission (at no additional cost to you), which supports my website and allows me to continue bringing you new projects and videos. I appreciate your support. Affiliate and product disclosures are found on my disclosure page. All products were personally purchased except for Spellbinders Country Christmas products, which were provided/sponsored by the company. I only use and recommend products I love. Click on the icons below each product picture to visit my favorite stores.


-
-
- Follow me on INSTAGRAM
- Join 38,000+ following me on PINTEREST
- Subscribe to my YOUTUBE Channel
- Follow me on FACEBOOK
- Amazon Store
- Follow my SOURDOUGH BREAD JOURNEY – over on my The Sour Strawberry BLOG
- JOIN my STAMP OBSESSION Facebook Group
- Check out my FREE PDF Gallery for over 350+ Card Making Tutorials
- How to make a SLIMLINE CARD – Info PAGE
- Do you like to stitch on cards? Then join our NEW FACEBOOK GROUP
-

– LOTS of great Paper Crafting Sales and New Releases going on this week – Check them out here

Amazing cards Sandi! Love the fun fold design, beautiful die cuts too! 🙂
Thank you Amy
What a splendid set of cards, Sandi! Love your snowman but I think
my favourite is the turquoise star in your favourite colour!!!
Thank you Sharon, yes, that one really pops too
These are all amazing cards Sandi, on your blog you show so many different designs and I just love them. xx
thank you Annie, yes, I got a bit carried away making these cards haha
gorgeous cards Sandi! the little screen and wreath go so well on the bridge card design.
Fabulous cards. Somehow I missed the original blog post and just happened on the video on YouTube. Your details for creating the star are wonderful. My first attempt was just OK, but with your details I’ll do better. Sadly I lost the berry die the first time I used it, but found some red bling that’s just the right size. Thanks for the bridge card PDF.
thank you Judy, good luck making the card, the star kind of takes holding your tongue the right way, LOL, but you will get it