
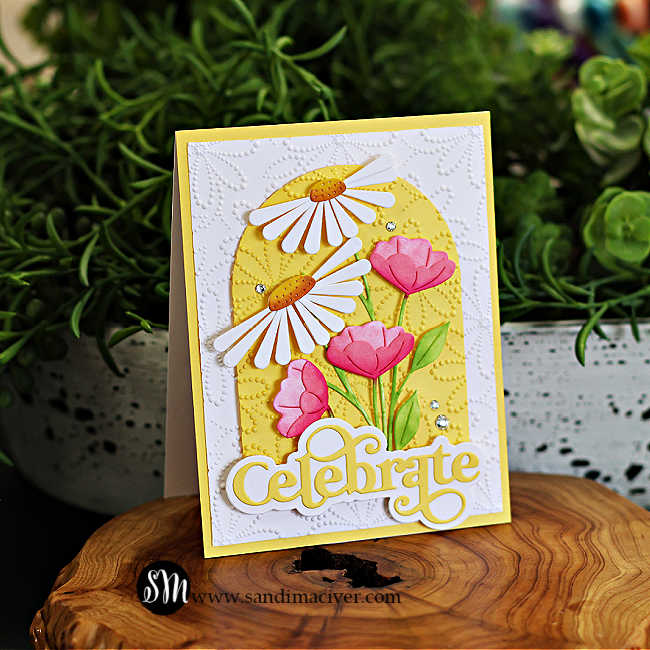
Hi crafters, welcome back! Today, I’m excited to share my Simon Says Stamp Tilted Daisies Die Cut Card, which proves that changing just a few details can give a familiar design a whole new look. This card uses the same layout, embossing folder, arched die cut, and sentiment die as yesterday’s project—but I swapped out the flower dies and switched up the colors. It’s like using a card sketch: a quick and easy way to create a fresh handmade card design without starting from scratch. Plus, since I still had all my supplies on my craft table, this pretty daisy card came together in no time at all!
Oh, and I should mention—today’s card is part of an exciting Instagram Hop celebrating my friend Nicki reaching 10K followers! There’s tons of cardmaking inspiration to enjoy, and by leaving comments along the hop, you’ll have a chance to win amazing prizes from some of our favorite stamping companies. Don’t miss out—join the hop HERE!
Card-making product affiliate links are used throughout this post at no additional cost to you. Your support enables me to continue providing you with content, and I genuinely appreciate your support!
Products used for the Simon Says Stamp Tilted Daisies Die Cut Card:
- Tilted Daisies Die Set
- Arctic Poppies Die Set
- A2 Arches
- Dainty Dotted Daisies Embossing Folder
- Boho Celebrate Wafer Dies
- Clear Pawsitively Dazzling Gems.
How to create the Simon Says Stamp Tilted Daisies Die Cut Card
Let’s go over the construction of the card base. There are lots of layers, but they’re simple and quick to put together.
- Start with a white top-folding A2 sized card base: 4-1/4″ x 11″, score and fold at 5-1/2″.
- Next cut a panel of yellow cardstock 4-1/2″ x 5-1/2″ and attach it to the card base.
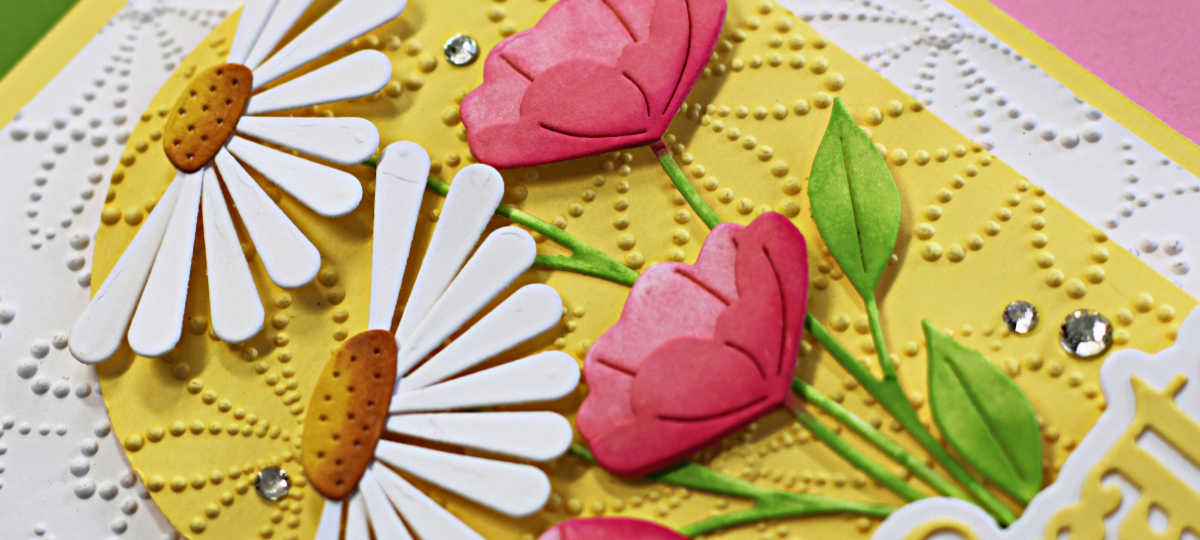
- Over that, cut an additional white panel 4″ x 5-1/4″ and emboss it with the Dainty Dotted Daisy folder. Adhere this panel to the yellow card front.
- Finally, die cut the arch from the same yellow cardstock. Emboss it with the Dainty Dotted Daisy Folder and then attach it with foam tape to the center of the card.
Can I just say how much I’m loving these A2 Arch dies? They’re nested, so you have plenty of sizes to choose from, and just one die cut adds instant interest and dimension to any card design. I love them!
That finishes the card base – now let’s move on to the new embellishment details.

Adding the Art Pieces and Sentiment:
- Start by die-cutting the Tilted Daisies and Arctic Poppies from the recent Friend Like You release using white cardstock. (Tip: Cut two of the poppies for extra fullness.)
- Next, use small blending brushes to ink blend the flowers and stems with Simon Says Stamp Pawsitively Saturated Inks in Rhubarb, Peony, Pearfection, Honey, and Paprika.
- Once the pieces are colored, arrange and adhere the flowers and stems onto the yellow arched panel. Add foam squares behind the flower heads to create depth and dimension.
- Die-cut both layers of the Celebrate sentiment, glue them together, and attach the sentiment across the bottom of the arch with foam squares for added lift.
- Finish the card with a touch of sparkle by embellishing it with a few Clear Pawsitively Dazzling Gems.

Click the button above to download a handy cardmaking PDF for this project—perfect to save and refer back to anytime!
You can view the entire FRIEND LIKE YOU release here
Visit my Card Making PDF Gallery for 350+ more card ideas.

Card Making Supplies used for the Simon Says Stamp Lifting hearts card:
Here are the products I used today. Compensated affiliate links used were available at no cost to you.
Clicking on a thumbnail link and shopping provides me with a small commission (at no additional cost to you), which supports my website and allows me to continue bringing you new projects and videos. I appreciate your support. Affiliate and product disclosures are found on my disclosure page. All products were personally purchased except for Spellbinders Monthly Club Kits, which were provided/sponsored by the company. I only use and recommend products I love. Click on the icons below each product picture to visit my favorite stores.


-
-
- Follow me on INSTAGRAM
- Join 38,000+ following me on PINTEREST
- Subscribe to my YOUTUBE Channel
- Follow me on FACEBOOK
- Amazon Store
- Follow my SOURDOUGH BREAD JOURNEY – over on my The Sour Strawberry BLOG
- JOIN my STAMP OBSESSION Facebook Group
- Check out my FREE PDF Gallery for over 350+ Card Making Tutorials
- How to make a SLIMLINE CARD – Info PAGE
- Do you like to stitch on cards? Then join our NEW FACEBOOK GROUP
-

– LOTS of great Paper Crafting Sales and New Releases going on this week – Check them out here
 Shop my Favorite Brands with my affiliate links
Changing the colour really makes big difference!
I’ll check out Instagram later! That’s quite an achievement!
it really is, and something I’m trying to aspire too as well, haha
Beautiful, colorful card! Love the embossed, arch die cuts too.
thank you Carmen
Such a sweet card Sandi! Love those flower die cut so much and your layering is perfect! 🙂
thank you Amy
beautiful sunny card! I love this composition and all the lovely layers Sandi.
Thanks so much Lisa, always fun to play with laying dies, same as your beautiful Tree Cards today