
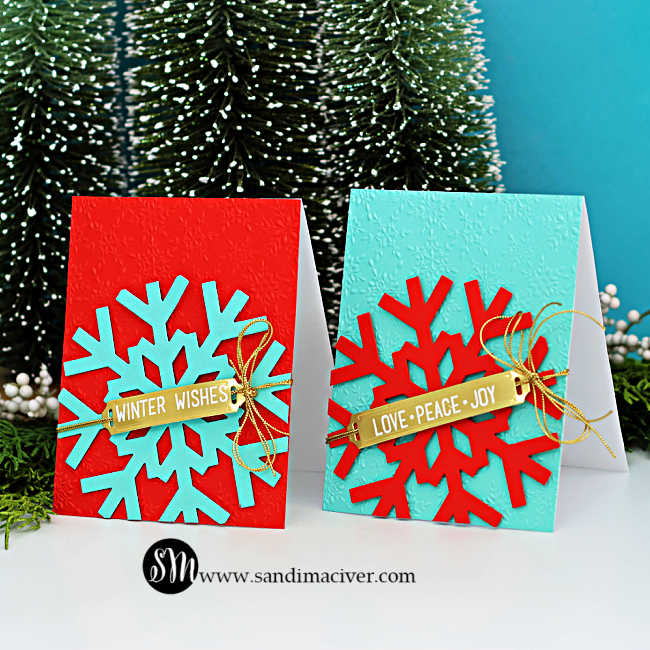
Hi cardmaking friends! I’m back with another Simple Large Snowflake Card – actually, two of them! These designs are super easy to mass-produce, perfect for the busy holiday season.
And Happy Halloween! I had every intention of sharing another spooky card with you today, but I needed to crate a few samples for Spellbinders for my next release…..so Christmas it is, LOL.
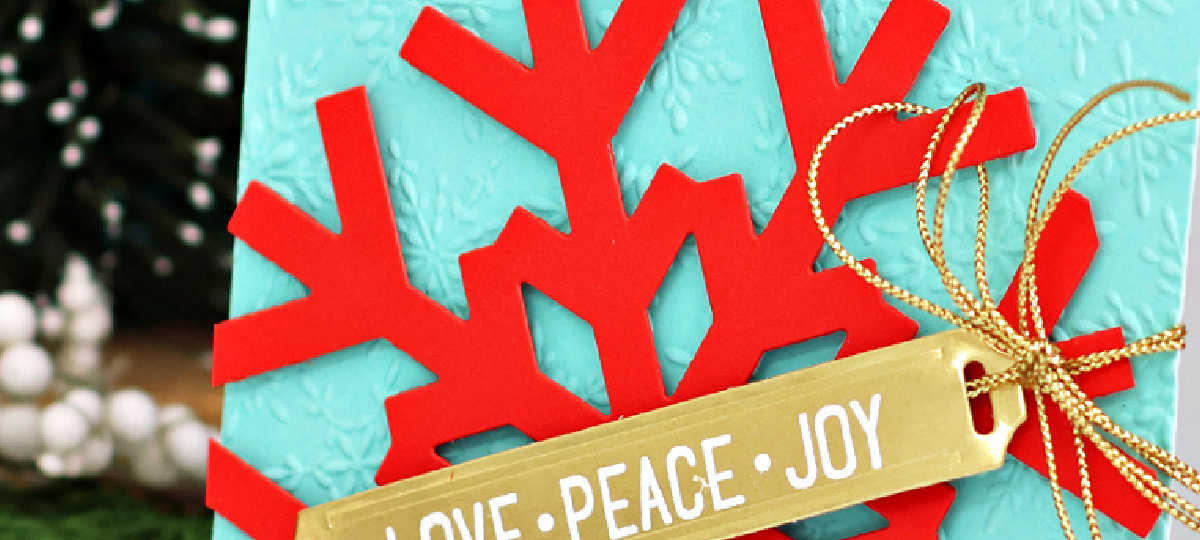
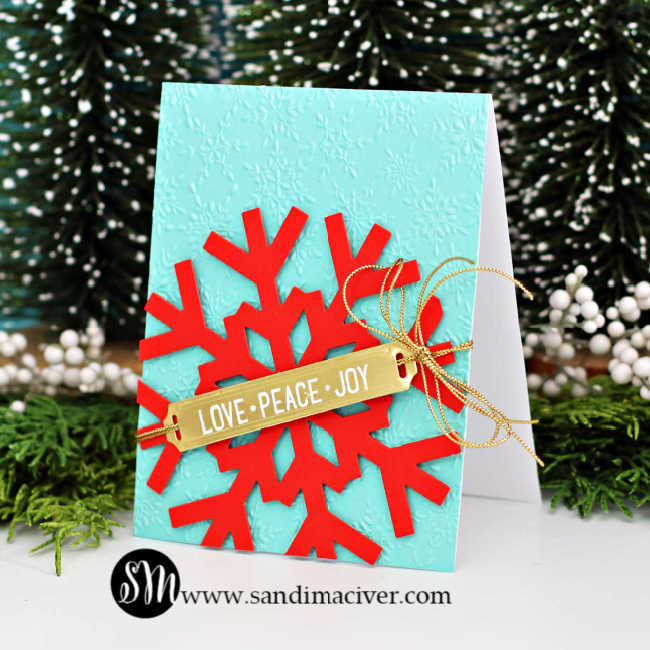
The Simon Says Stamp Large Snowflake Die truly steals the show on these quick and easy cars. I used a bold, modern color combo borrowed (ok, stolen!) from a David’s Tea package from a few years ago The mix of Poppy and Waterfall cardstock is on fleek – so fresh and fun!
For extra texture I embossed the background of each card, but you could also emboss the snowflakes themselves using the Cheery Snowflake 3D Embossing Folder. To finish, I added a sentiment using the Label Slides Stamp and Die Set and tied everything together with a touch of shiny gold cord.
Products used to create the Simple Large Snowflake Card:
- Large Snowflake Die #1331sd
- Label Slider Christmas Stamps
- Label Sliders Dies #1353sdc
- Cheery snowflakes 3D embossing Folder
Step-by-step instructions For the Simple Large Snowflake Card:
1 – Create the Card Base:
Let’s get started! Cut two card front panels – One from Spellbinders Waterfall and one from Poppy cardstock, each measuring 4-1/4″ x 5-1/2″. Pop the panels into the Cheery Snowflakes 3D Embossing Folder and emboss for that gorgeous, frosty texture. Then, attach each panel to a top-folding A2-sized white card base (4-1/4″ x 11″, score and fold at 5-1/2).
2 – Die-Cut the Snowflake
Now for the star of the show – the Large Snowflake Die! Cut one snowflake from each color (Waterfall and Poppy) using 4-1/4″ x 5-1/2″ panels of cardstock. Use foam squares cut in half to pop up the snowflake on the card front at a fun angle – it adds instant movement and dimension. Open the card and carefully trim off any overhang from the back for a clean finish.
3- Create the Sentiment
Time to shine! Place a piece of Gold Mirror cardstock into your Misti, stamp the sentiments with VersaMark Ink and white heat emboss for a crips, elegant look. Die cut the embossed pieces using the label slides dies – they’re the perfect polished touch for these modern snowflake cards.
4 – Finishing Up
Slide a double length of gold cord through each label slide, then add a few foam squares to the back of the sentiment strip to hold it in place while you attach it across the center of the snowflake. Gently pull the left-side cards around the card front and tie them into a neat bow on the right-hand side. Tim the tails for a clean finish.
5 – Embellishing
I did consider adding a few gems to the tips of the snowflakes for extra sparkle – but honestly, there’s already plenty going on! Plus, you know how I feel about paying extra postage, haha.
 Here is the image that inspired my color combo for today. You just never know where you are going to get inspiration from!. Thanks David’s Tea – BTW – their tea is amazing.
Visit my Card Making PDF Gallery for 350+ more card ideas.

Card Making Supplies used for the Simon Says Stamp Lifting hearts card:
Here are the products I used today. Compensated affiliate links used were available at no cost to you.
Clicking on a thumbnail link and shopping provides me with a small commission (at no additional cost to you), which supports my website and allows me to continue bringing you new projects and videos. I appreciate your support. Affiliate and product disclosures are found on my disclosure page. All products were personally purchased except for Spellbinders Monthly Club Kits, which were provided/sponsored by the company. I only use and recommend products I love. Click on the icons below each product picture to visit my favorite stores.


-
-
- Follow me on INSTAGRAM
- Join 38,800+ following me on PINTEREST
- Subscribe to my YOUTUBE Channel
- Follow me on FACEBOOK
- JOIN my STAMP OBSESSION Facebook Group
- Check out my FREE PDF Gallery for over 350+ Card Making Tutorials
- How to make a SLIMLINE CARD – Info PAGE
- Do you like to stitch on cards? Then join our NEW FACEBOOK GROUP
-

– LOTS of great Paper Crafting Sales and New Releases going on this week – Check them out here
 Shop my Favorite Brands with my affiliate links
Cute cards Sandi! Love the gold trim, perfect winter cards! 🙂
Thanks so much Amy
My favourites, Sandi! They are gorgeous ! Think I’ll have a go!!!
Thanks Sharon, tag me if you share them I would love to see yours.
ABSOLUTELY gorgeous
Thank you so much Natasha
bold and beautiful! love the simplicity, perfect for multiples.
Thank you Lisa, some days you just need simple, haha