
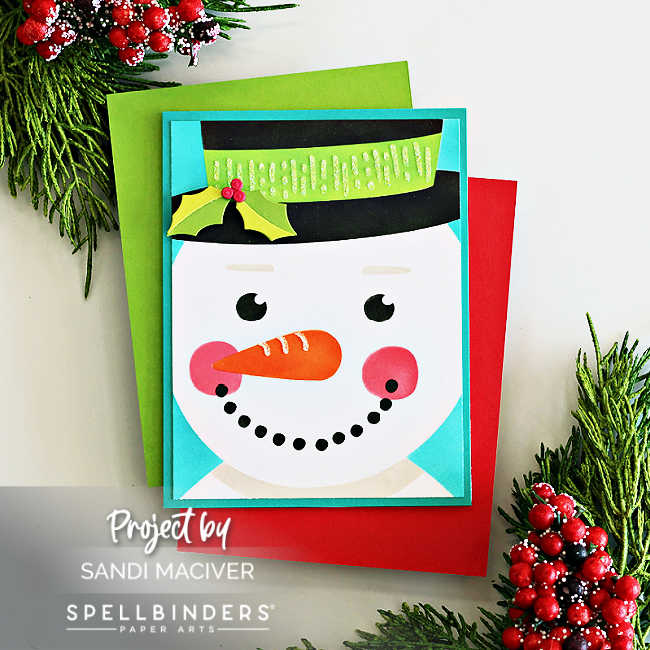
Hey, card-making friends! Welcome Back!. Today, I’m sharing a super fun project – the Spellbinders Simple Frosty Christmas Card. This cheerful design is flat and almost one-layer, making it quick, easy, and perfect for mass production.
Created with the October Stencil of the Month, “Frosty Wishes,” this card comes together in no time—ideal for crafting with your kids or grandkids! I love the big, bold design, and Frosty looks adorable in any color combination you choose.
The best part? He’s almost flat (except for the holly), which means no extra postage is required—my absolute favorite kind of holiday card!

SALE – and speaking of clubs, Spellbinders just announced a CLUB CLASSIC EVENT – a limited time sale you won’t want to miss. This special event is open to everyone, but club members save even more.
Hurry – the sale ends Oct 12 – VISIT THE CLUB CLASS EVENT HERE
Card-making product affiliate links are used throughout this post at no additional cost to you. Your support enables me to continue providing you with content, and I genuinely appreciate your support!
Products Used for today’s Spellbinders Simple Frosty Christmas Card:
- October Stencil of the Month Club – Frosty Wishes
- Christmas Foliage die set from the Lisa Horton All About Christmas Release
- Fallen Snow Glitter Glaze

Instructions: Spellbinders Simple Frosty Christmas Card.
1 – Prepare the card front:
Cut a piece of white cardstock 4″ x 5-1/4″ and secure to a protected work surface.
2 – Stencil Frosty:
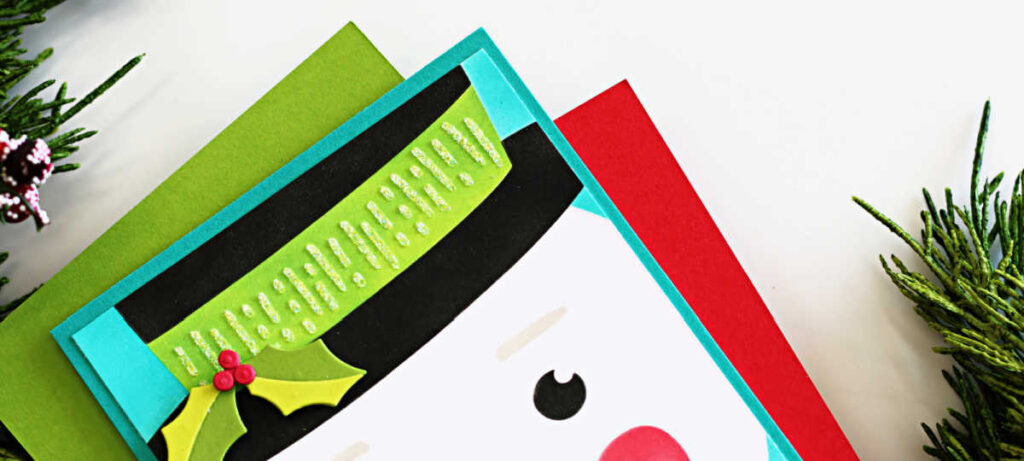
Next, use the Frosty Wishes layering stencils to add color and layers of ink.
Note – for the final stencil layer, I added Fallen Snow Glitter Glaze to give the hat and nose a subtle, sparkly highlight. It’s the perfect finishing touch to make Frosty shine!
Distress Oxide Inks Used:
- Pumice Stone
- Ripe Persimmon
- Black Soot
- Worn Lipstick
- Mowed Lawn
- Peacock Feathers
3 – Assemble the Card Base:
Then, create a white a2-sized top-folding card base (4-1/4″ x 11″, score and fold at 5-1/2″).
Adhere a teal topaz cardstock panel measuring 4-1/4″ x 5-1/2″ to the front of the card base, then attach your completed Frosty Panel on top.
4 – Add the Finishing Touch:
Finally, die cut the holly from the Lisa Horton All About Christmas – Christmas Foliage Die set. Layer and adhere it to the left side of Frosty’s hat using foam squares for dimension, or, use liquid glue if you prefer to keep the card flat for easy mailing.
PRO-TIP: Try switching up Frosty’s hat or background colors for a whole collection of cheerful, easy-to-mail holiday cards.


Card Making Supplies used for the Spellbinders Simple Frosty Christmas Card:
Here are the products I used today. Compensated affiliate links used were available at no cost to you.
Clicking on a thumbnail link and shopping provides me with a small commission (at no additional cost to you), which supports my website and allows me to continue bringing you new projects and videos. I appreciate your support. Affiliate and product disclosures are found on my disclosure page. All products were personally purchased except for Spellbinders Monthly Club Kits, which were provided/sponsored by the company. I only use and recommend products I love. Click on the icons below each product picture to visit my favorite stores.


-
-
- Follow me on INSTAGRAM
- Join 38,800+ following me on PINTEREST
- Subscribe to my YOUTUBE Channel
- Follow me on FACEBOOK
- JOIN my STAMP OBSESSION Facebook Group
- Check out my FREE PDF Gallery for over 350+ Card Making Tutorials
- How to make a SLIMLINE CARD – Info PAGE
- Do you like to stitch on cards? Then join our NEW FACEBOOK GROUP
-

– LOTS of great Paper Crafting Sales and New Releases going on this week – Check them out here
 Shop my Favorite Brands with my affiliate links
Such a cute card! Love the smiling snowman, perfect for the holidays! 🙂
thank you Amy
very sweet. love the addition of the Holly and Berries on his hat!