
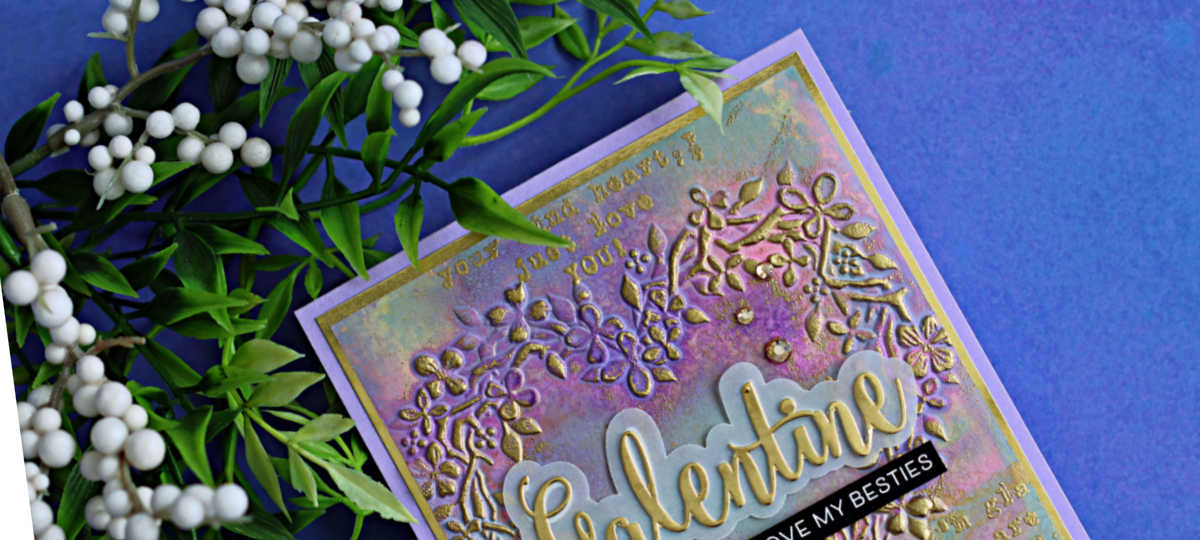
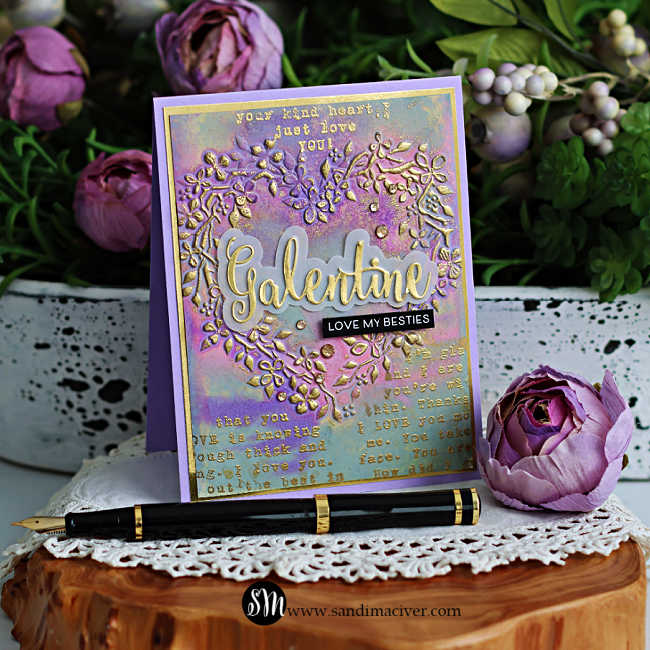
Hey friends! I have a new cardmaking video to share with you today featuring an embossed card created with Distress Oxide Ink Sprays. I had so many questions about the background on THIS CARD I shared last week, I thought it would be fun to create a simpler version – this time without the Copic-colored flowers.
For the focal point, I used the beautiful Heart Wreath from the recent Simon Says Stamp Heart to Heart release, and in the video, I walk you through how to use Distress Oxide Ink Sprays to add color and depth and gold embossing to highlight the embossed panel.
and yes….a quick personal note.
I know it’s been a little while since I’ve posted a video. After dealing with ongoing issues with Adobe, I finally. (after 18 years), made the switch to Filmora for video editing – and wow! I’m kicking myself for not changing sooner! After editing this video, I can say the program is incredibly easy to use and, best of all, it just works. If you enjoy video editing (or don’t enjoy – as in my case), I highly recommend giving Filmora a try (and it’s WAY cheaper too).
Thanks so much for your patience and support, and I hope you enjoy the video!
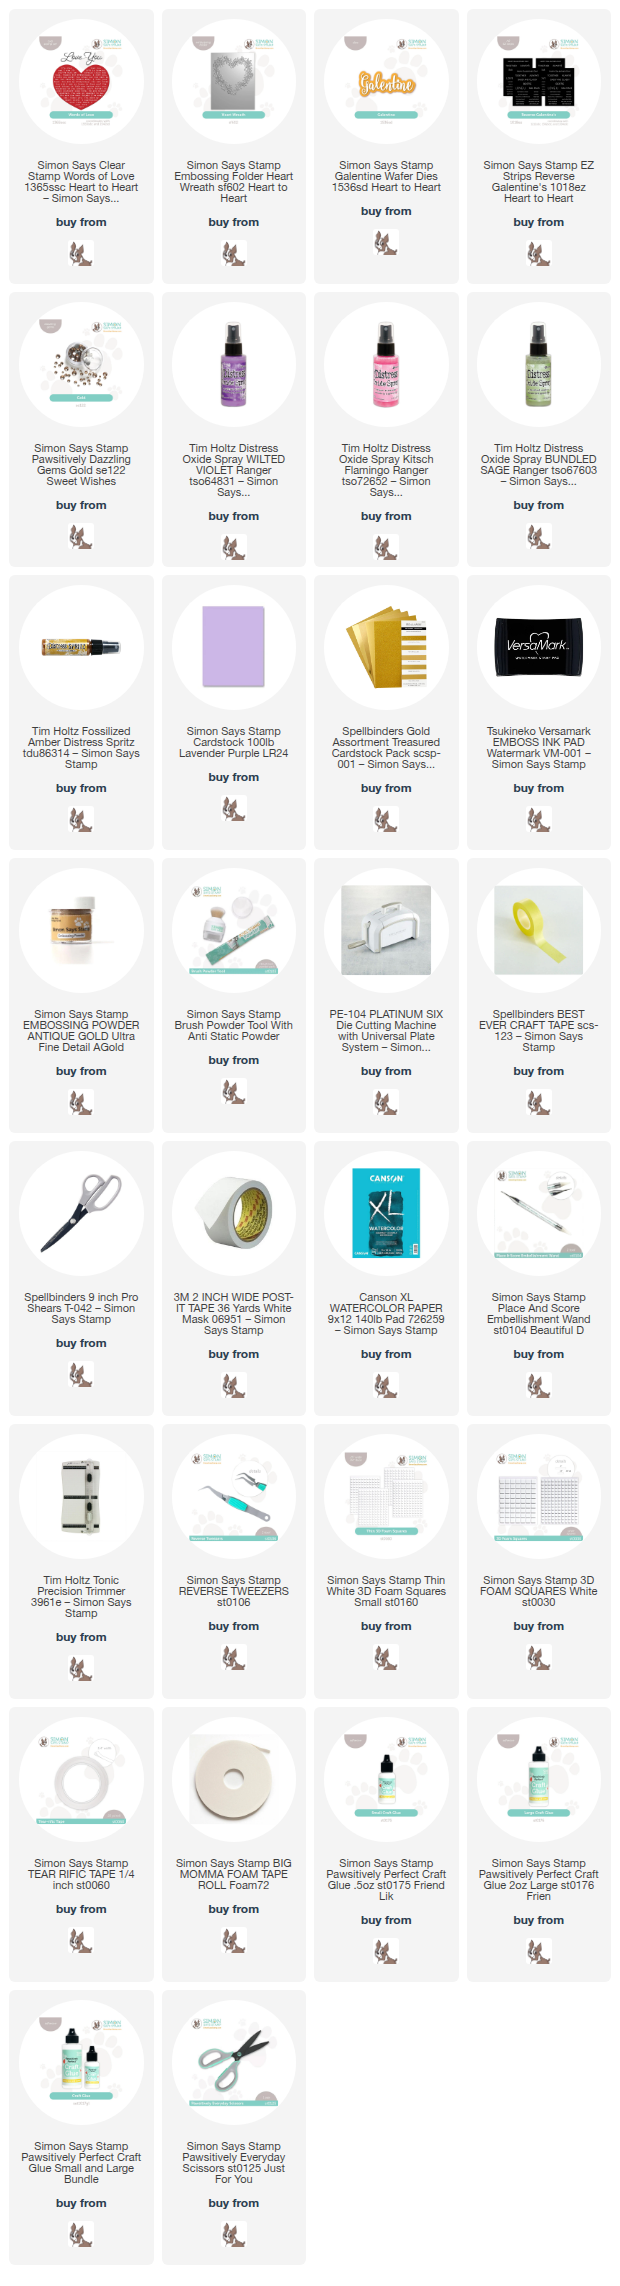
Products used in today’s Embossed Card with Distress Oxide Ink Sprays Video:
- Heart Wreath 3D Embossing Folder
- Words of Love Stamp
- Galentine 2 piece die set
- Reverse Galentine Love EZ Strips
- Gold Pawsitively Dazzling Gems
- Distress Oxide Ink Sprays: Wilted Violet, Kitsch Flamingo, Bundled Sage, and overspray – Fossilized Amber Distress Spritz
How to create the Embossed Card with Distress Oxide Ink Sprays:
I walk you step-by-step through the process in the video, but here are a few extra details to help you recreate this card.
Cardstock Cuts:
- Card base: 4-1/4″ x 11″, score and fold at 5-1/2″ – Lavender
- Mat: 4″ x 5-1/4″ – gold
- Art piece: 3-7/8″ x 5-1/8″ watercolor paper
Background and Embossing:
- Spritz both sides of the watercolor paper with water, then emboss it with the Heart Wreath Embossing Folder.
- Next, while keeping the paper wet, apply the Distress Oxide Ink Sprays, then heat set to dry.
- Heat emboss the background using the Words of Love stamp.
- Heat emboss the raised embossed heart wreath in gold to highlight the texture.
- Die cut and assemble the sentiment, and attach to the center of the heart.

You can view the Embossed Card with Distress Oxide Ink Sprays video here
Thanks so much for stopping by! I hope you enjoyed today’s video and feel inspired to give this technique a try. If you did enjoy it, please consider clicking the thumbs up, leaving a kind comment, and sharing it with your friends on social media. It truly helps support my channel, and I’m so grateful for your support.

Card Making Supplies used for the Embossed Card with Distress Oxide Ink Sprays:
Here are the products I used today. Compensated affiliate links used were available at no cost to you.
Clicking on a thumbnail link and shopping provides me with a small commission (at no additional cost to you), which supports my website and allows me to continue bringing you new projects and videos. I appreciate your support. Affiliate and product disclosures are found on my disclosure page. All products were personally purchased except for the Simon Says Stamp Heart to Heart Release products, which were provided/sponsored by the company. I only use and recommend products I love. Click on the icons below each product picture to visit my favorite stores.


-
-
- Follow me on INSTAGRAM
- Join 38,800+ following me on PINTEREST
- Subscribe to my YOUTUBE Channel
- Follow me on FACEBOOK
- JOIN my STAMP OBSESSION Facebook Group
- Check out my FREE PDF Gallery for over 350+ Card Making Tutorials
- How to make a SLIMLINE CARD – Info PAGE
- Do you like to stitch on cards? Then join our NEW FACEBOOK GROUP
-

– LOTS of great Paper Crafting Sales and New Releases going on this week – Check them out here
 Shop my Favorite Brands with my affiliate links
Oh my goodness, how pretty! Love the background and your layered sentiment is fantastic! 🙂
thank you Amy
This is ABSOLUTELY gorgeous
thank you Natasha
This is a beauty and I will watch your video later to see
just how you did it!
A lovely card Sandi- always enjoy your videos. You’re an excellent teacher!
aw, thanks so much Donna
Love the look. Love the instructions. Love that you take the time to share your talent with all of us. Thank you, Sandi!
aw, thank you Karen, I’m so glad you like it and thank you for watching
Sandi very lovely video and most exquisitely designed, just love listening and learning thank you xx
thank you so much Annie, I appreciate you watching.
it’s really beautiful Sandi, so much interest and texture.
Thank you Lisa, and super easy to make too