
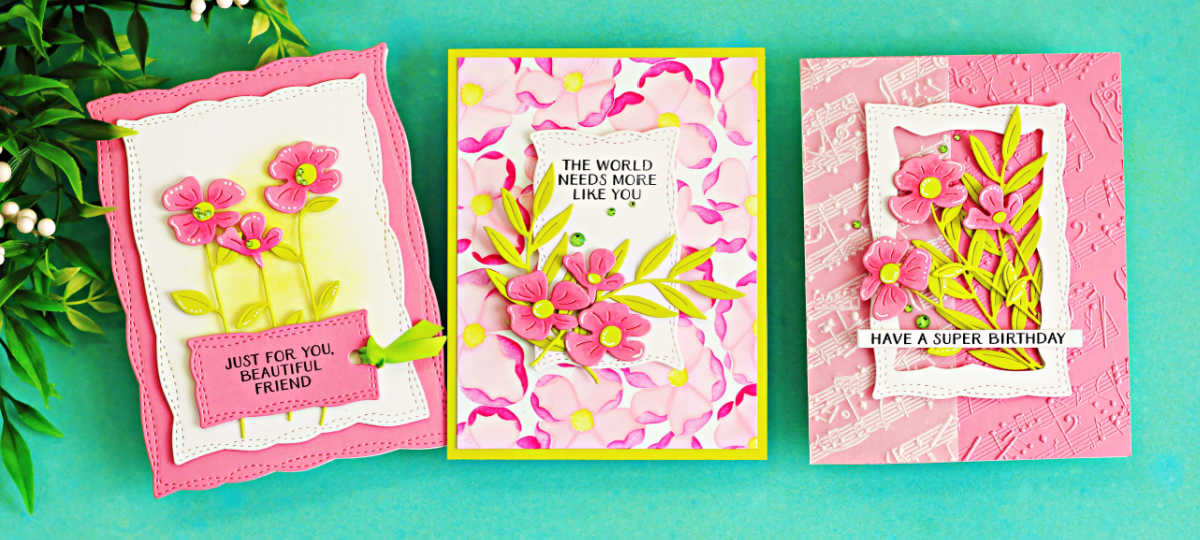
Hi crafty friends – welcome back! Today I’m sharing 3 handmade card ideas created with the gorgeous Spellbinders Poppy Song collection, which released on the 10th. This beautiful bundle of coordinating products makes it easy to create elegant floral cards with plenty of charm and detail. The sweet little Leaf and Bloom flower die set is adorable and quick to assemble, the Petal Burst layering stencil creates a stunning background, as does the Favorite Song Embossing Folder and the Playful Stitched Panels add the perfect finishing touch.
I made three completely different handmade card designs, and you’ll find the step-by-step instructions for each one below.
Products used for Today’s Poppy Song Hand Made Card Ideas.
- Poppy Song Leaf and Bloom Dies
- Playful Stitched Panels
- Petal Burst Layering Stencil
- Favorite Song Embossing Folder
- Sentiments – Good Times – March 2026 Clear Stamp and Die of the Month bundle
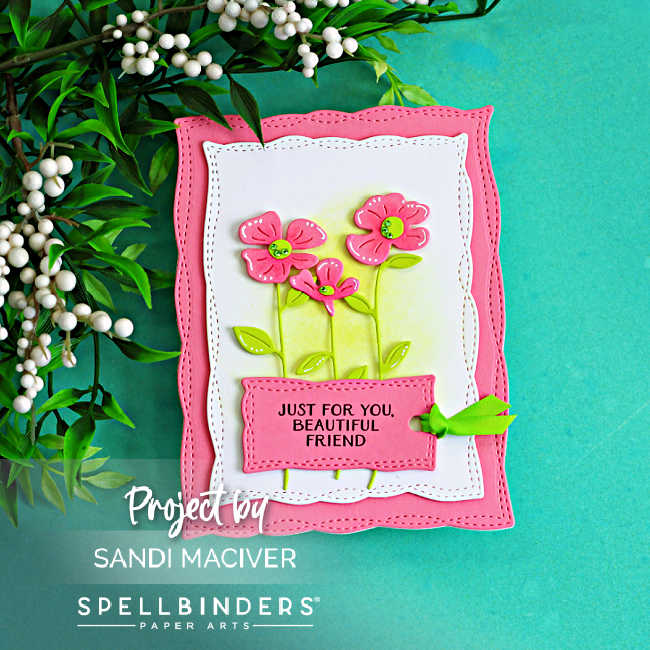
Card 1 – Playful Stitched Panel Shaped Card
The larges Playful Stitched Die is perfectly sized for an A2 card base, so I decided to turn it into a shaped card. Adding two more layers using the same dies creates a beautifully balanced and cohesive design. By keeping the flowers, leaves, and ribbon in the same color palette, the eye flows effortlessly across the entire card.
Create the Card Base:
Cut panels of Tutu and white cardstock to 4-1/4″ x 5-1/2″ and die cut both using the largest Playful Stitched Panels Die.
Score down the left side of the white panel to create the fold for the card base. Add red-line take to the left of the score line, then adhere the Tutu panel overtop to form the shaped card base.
Create the Art piece and Sentiment.
Cut another panel of white cardstock to 4-1/4″ x 5-1/2″ and die cut it using the second largest Playful Stitched Panels die. While your’e die cutting, also cut the label from a scrap of Tutu cardstock.
Lightly ink blend Gina K Key Lime Ink into the center of the white panel and set aside.
Die cut the flowers and stems from Tutu and Peridot cardstock. Add a touch of Gina K Light Cranberry ink to the center of each flower for added depth, then adhere the green centers and stems. Attach the flowers to the panel using small foam squares for dimension.
Stamp the sentiment in black into onto the label, then tread a piece of green ribbon through the hole.
Assemble the Card:
Use foam tape to attach the white art panel to the center of the card base, adding depth and dimension.
Finish by adhering the sentiment across the bottom of the stems with foam squares.
Add a few Peridot Color Essential Gems, to the center of each flower for touch of sparkle, then use a #10 Sukura White Gel pen to add soft highlight details to the petals.
Card 2 – Favorite Song Embossed and Die Cut Panel
Create the Card Base:
Cut a panel of Tutu cardstock to 4-1/4″ x 5-1/2″ and emboss it with the Favorite Song Embossing Folder. Adhere it to a top-folding A2-sized white card base.
Next, cut a strip of vellum to 2″ x 5-1/2″ and emboss it as well. Use small drops of white glue behind the embossed area to attach it down the left side of the card front.
Die cut a white frame using the two smaller Playful Stitched Panel and adhere it to the center of the card with foam tape for added dimension.
Add the flowers and Sentiment:
Die cut two fern branches and three flowers, then arrange and adhere them inside the frame.
Use a white gel pen to add soft highlight details to the flowers and leaves.
Stamp the sentiment onto white cardstock, die cut it with the coordinating die, and adhere it across the bottom of the frame.
Finish with a light sprinkle of Peridot Color Essential Gems for a touch of sparkle.

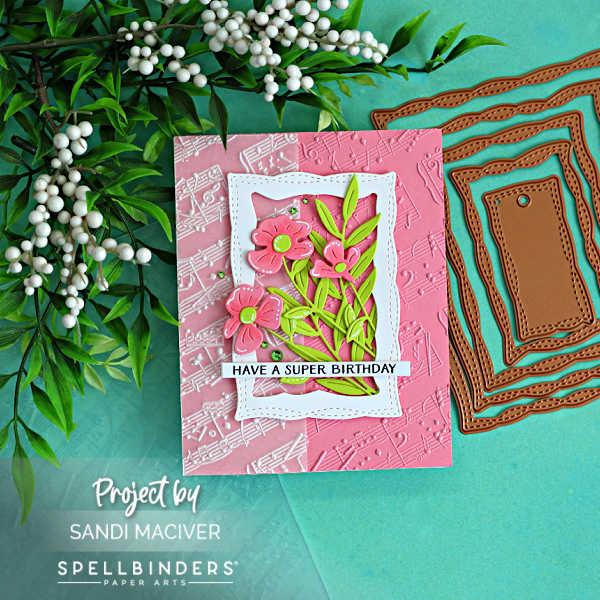
Card 3 – Petal Burst Stenciled Background
This multi layered stencil set creates the most beautiful backdrop to these pretty die cut flowers.
Create the Card Base:
Cut a panel of Peridot cardstock to 4-1/4″ x 5-1/2″ and adhere it to a top-folding A2-sized white card base.
Next, cut a panel of white cardstock to 4″ x 5-1/4″ and secure it to a sticky mat. Use the Petal Burst stencil to create the background using:
- Gina K Designs Light Cranberry
- Gina K Designs Medium Cranberry
- Gina K Designs Key Lime
Once complete, adhere the stenciled panel to the card base.
Die cut the Foliage and Center Panel:
Use one of the smaller Playful Stitched Panels to die cut a white center panel, sizing it to fit your sentiment. Stamp the sentiment at the top in black ink.
Next, die cut the flower heads, centers, and two fern branches. Adhere the pieces together and then add highlights with a white gel pen.
Assemble the Card:
Use foam squares to attach the sentiment panel to the center of the card.
Add the fern branches first, then cluster the flowers in the bottom left corner for a balanced design.
Embellish with a few Peridot Color Essential Gems for a touch of sparkle.
I hope you enjoyed these 3 handmade card ideas using the Poppy Song collection. Whether you love die cutting, or layering, there’s something here for everyone. Let me know in the comments — which one is your favorite.


Never Miss a Cardmaking Tutorial
Subscribe to my blog and get the latest cardmaking ideas, tutorials, and inspiration delivered straight to your inbox — plus access to exclusive content and updates you won’t want to miss!

Visit my YouTube channel for 270+ cardmaking tutorials, techniques, and creative ideas to inspire your next project
Cardmaking Supplies Used:
Here are the supplies I used to create today’s Poppy Song Die Cut Greeting Cards | 3 Handmade Card Ideas.
Many of the links below are compensated affiliate links. This means if you click through and make a purchase, I may receive a small commission at no additional cost to you.
These commissions help support my website and allow me to continue sharing cardmaking tutorials, videos, and inspiration. I truly appreciate your support.
All products were personally purchased unless otherwise noted. Spellbinders Poppy Song products were provided by the company for design purposes.
You can find my full affiliate disclosure on my disclosure page.
Click the icons below each product to shop my favorite stores.
Let’s Connect & Get Inspired
Follow along for more cardmaking ideas, techniques, and tutorials:
- Follow me on Instagram
- Join 38,800+ creatives on Pinterest
- Subscribe to my YouTube Channel
- Follow me on Facebook
- Join my Cardmaking Obsession Facebook Group
FREE Cardmaking Tutorials Library
Looking for more inspiration? Explore my FREE PDF GALLERY with 359+ cardmaking tutorials — packed with ideas, techniques, and step-by-step projects to spark your creativity.

Don’t Miss This Week’s Deals
Lot’s of great paper crafting sales and new releases happening now — check them out here!

Shop My Favorite Craft Brands
Browse my Go to Brands and supplies using my affiliate links.
Such pretty cards Sandi! The die cut flowers are beautiful, love the backgrounds that you’ve created too! 🙂
thank you Amy
Gorgeous cards! Love the pink/ yellow combination!
Certainly bright and cheerful!
Thank you Sharon, they were fun to create
oh so lovely – all of them! So wishing I’d had time to play with this release – I love your cards Sandi.
Thank you Lisa, there are so many releases it’s hard to pick