
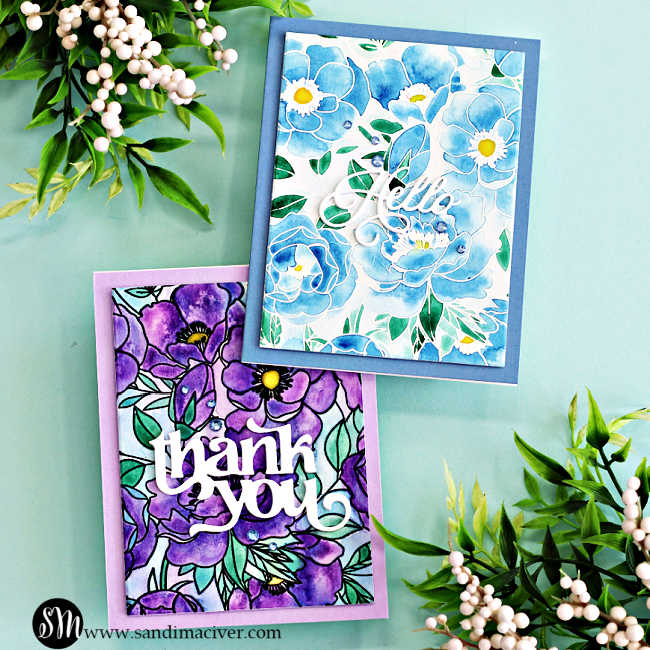
Hi, cardmaking friends—welcome back! Today I’m excited to share two Simon Says Stamp Delicate Blossoms messy watercolor cards with you. I’ve been eyeing this gorgeous stamp for a while—it’s huge (in the best way!), but I wasn’t in the mood for Copic coloring. Instead, I decided to heat emboss the image and break out my Gansai Tambi watercolors for some loose, messy painting. I created both a black-embossed and a white-embossed version to see which one I’d love more… then dove right in, splashing on vibrant color and letting the paint work its magic.
You can view the entire Simon Says Stamp Happy Camper Release here:
Card-making product affiliate links are used throughout this post at no additional cost to you. Your support enables me to continue providing you with content, and I genuinely appreciate your support!

Products Used for the Simon Says Stamp Delicate Blossoms Messy Watercolor Cards:
- Delicate Blossoms Stamp and Die Set
- Nuvelli Script Hello Die Set
- Fancy Thank you Die Set
- A2 Rectangles Dies
- Gansai Tambi Watercolors – Colors Used: Purple card:#139, 66, and 56 and #66, 56 and 63 for the Blue card.
How to create the Simon Says Stamp Delicate Blossoms Messy Watercolor Cards:
Start with a 5″ x 7″ piece of watercolor paper and heat emboss the Delicate Blossoms image. As I mentioned earlier, I created one in black and one in white—partly to see which I liked best, and partly because it’s just fun to experiment and see what happens, LOL.
Next, tape each panel to a piece of stiff cardboard to prevent warping.
Using a clean, wide paintbrush, wet the entire surface with water. Then begin adding a light color for a background wash. Next, start adding the darker colors, letting it naturally flow and blend into the petals and leaves. The raised heat embossing helps keep the pigments contained within each section for a beautifully defined look.

-
Keep the section wet – Work in small areas at a time, ensuring the section stays damp while you add color.
-
Prep with clean water – Use a smaller, clean brush to apply water to the area before introducing more pigment.
-
Apply the base color – Lay down your main color first, letting it flow naturally within the embossed lines.
-
Add a secondary shade for depth – On the purple card, I brushed in blue near the flower centers to create richer shadows.
-
Layer the leaves – For the leaves, apply a second wash of the same green and let it run slightly for a soft, blended effect.

Putting the card together:
Once the watercolor panel is completely dry, trim it with the A2 Rectangles Dies—I used the third largest die for these A2-sized cards. This creates a beautifully smooth, rounded edge for a professional finish.
Cut a 4-1/4″ x 5-1/2″ panel from coordinating cardstock and adhere it to a white, top-folding A2 card base (4-1/4″ x 11″, scored and folded at 5-1/2″).
Add foam tape to the back of the watercolor piece and mount it in the center of the card.
For the sentiment, die-cut the Nuvelli Script Hello three times, stack the layers for dimension, and adhere it to the card front. For the purple version, substitute the Fancy Thank You Die.
Finish with coordinating gems—Dusk Pawsitively Dazzling Gems add just the right touch of sparkle.
Visit my Card Making PDF Gallery for 350+ more card ideas.

Card Making Supplies used for the Simon Says Stamp Delicate Blossoms Messy Watercolor Cards:
Here are the products I used today. Compensated affiliate links used were available at no cost to you.
Clicking on a thumbnail link and shopping provides me with a small commission (at no additional cost to you), which supports my website and allows me to continue bringing you new projects and videos. I appreciate your support. Affiliate and product disclosures are found on my disclosure page. All products were personally purchased except for the Simon Says Stamp Happy Camper Release Products, which were provided/sponsored by the company. I only use and recommend products I love. Click on the icons below each product picture to visit my favorite stores.


-
-
- Follow me on INSTAGRAM
- Join 38,000+ following me on PINTEREST
- Subscribe to my YOUTUBE Channel
- Follow me on FACEBOOK
- Amazon Store
- Follow my SOURDOUGH BREAD JOURNEY – over on my The Sour Strawberry BLOG
- JOIN my STAMP OBSESSION Facebook Group
- Check out my FREE PDF Gallery for over 350+ Card Making Tutorials
- How to make a SLIMLINE CARD – Info PAGE
- Do you like to stitch on cards? Then join our NEW FACEBOOK GROUP
-

– LOTS of great Paper Crafting Sales and New Releases going on this week – Check them out here
 Shop my Favorite Brands with my affiliate links
Oh my goodness, your cards are beautiful Sandi! Love the floral images and the die cut sentiments, perfect! 🙂
They are both terrific, Sandi, but I do love the purple one. It is striking!
The blue one is pretty and subdued!
Beautiful cards, Sandi. So much fun to see different techniques and read how you achieved each different art piece!
So pretty Sandi