
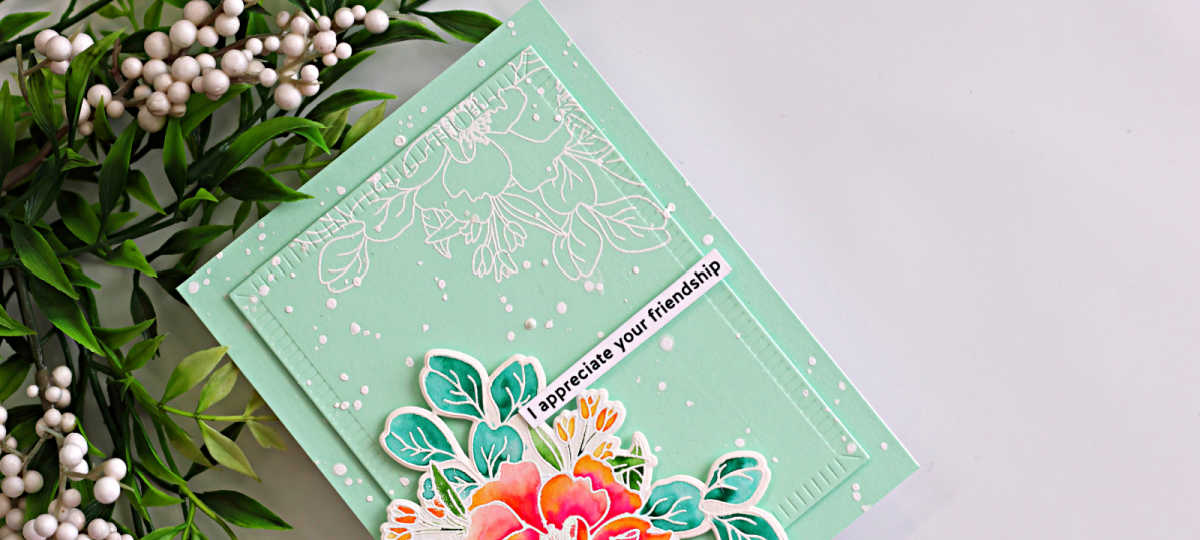
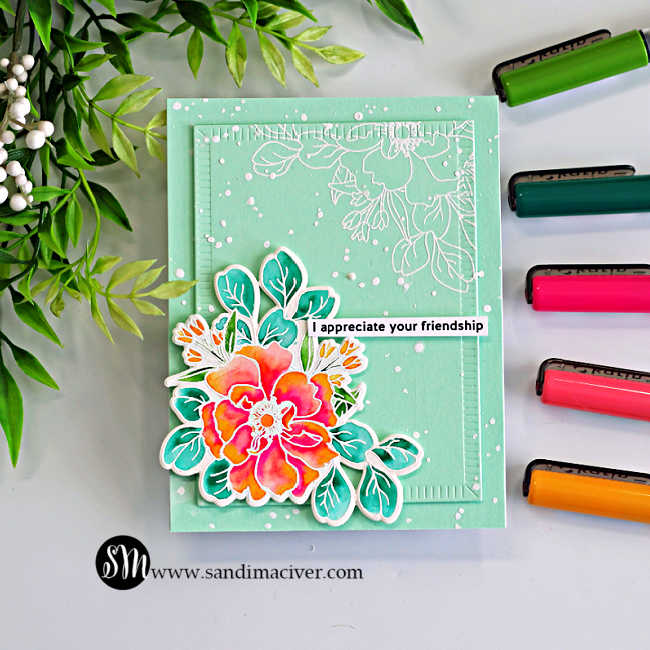
Ok, we’re changing things up today and stepping away from the brights for a soft, subtle messy watercolor wild rose card. This one is quick, easy, and has a BIG wow factor without needing perfect coloring skills. The loose watercolor look is forgiving, artsy, and beautiful–exactly the kind of technique that lets you relax and just play.
I heat embossed the Wild Rose image in white, then used Karin Markers to add that soft, messy watercolor effect. It doesn’t get much easier than that–Okay, yes it does, because there’s also a coordinating die to cut out the image. YEAH!
Keep reading for the simple step-by-step instructions to create this messy watercolor wild rose card.
Products used for today’s Messy Watercolor Wild Rose Card:
- Simon Says Stamp Wild Rose Stamp and Die Set
- Simon Says Stamp Crimped A2 Rectangles
- Simon Says Stamp Beautiful Friend EZ Strips (sentiment)

How to create the Messy Watercolor Wild Rose Card:
Create the Card Base:
Start with a 4-1/4″ x 11″ panel of white cardstock and score at 5-1/2″ to create a top folding A2-sized card base.
Next, cut two panels of Mint cardstock to 4-1/4″ x 5-1/2″ and attach one to the card base.
Die cut the second panel using the second largest Crimped A2 Rectangles die.
Before attaching it, white heat emboss the rose image in the top right corner of the panel. Then adhere it to the card base using foam tape for added dimension.
Place the card inside a splat box and white paint splatter for that soft, artistic finish.
PRO-TIP: Splatter before adding your focal image to keep those florals nice and clean and bright.
Create the Art Piece:
Cut a piece of watercolor paper to 4-1/4″ x 5-1/2″. Stamp the rose image using VersaMark Ink, cover with white embossing powder, shake off the excess and heat set.
Use Karin Markers and a water brush to create the messy watercolor effect.
Karen Markers Used:
- #375 – Cerise
- #220 – Pale Pink
- #357 – Pale Orange
- #281 – Olive Green
- #228 – Lush Green
Coloring instructions:
Work one petal at a time. Lightly wet the petal with your water brush, then add a small amount of Pale Pink at the bottom of the petal. Use the water brush to pull the color outward to the tip, it will lighten as you pull it.
While the petal is still wet, color a line at the bottom with the Cerise, then a dash of the Pale Orange on the left side tip, let these blend. This is where the “messy watercolor” magic happens!
If the colors aren’t moving, simply add a bit more water with your brush to encourage that soft blending.
For the leaves, flood the area lightly with water, then drop in Lush Green at the bottom of the leaf and let it flow. use your brush to pull the color towards the tips.
Repeat this process for the tulips and leaves using the yellow and green pens
PRO-TIP: Don’t overwork it–those soft blends and slight imperfections are what make this technique so beautiful.
Die Cut the Image:
Once the panel is dry, die-cut it with the coordinating die.
Assemble the Card:
Attach the floral piece to the bottom left corner of the card using foam squares.
Trim a sentiment from the Beautiful friend EZ strips and adhere it to the right of the card, slightly overlapping the floral arrangement.
PRO-TIP: That overlap helps tie the whole design together and adds a nice, polished finish.


Never Miss a Cardmaking Tutorial
Subscribe to my blog and get the latest cardmaking ideas, tutorials, and inspiration delivered straight to your inbox — plus access to exclusive content and updates you won’t want to miss!

Visit my YouTube channel for 270+ cardmaking tutorials, techniques, and creative ideas to inspire your next project
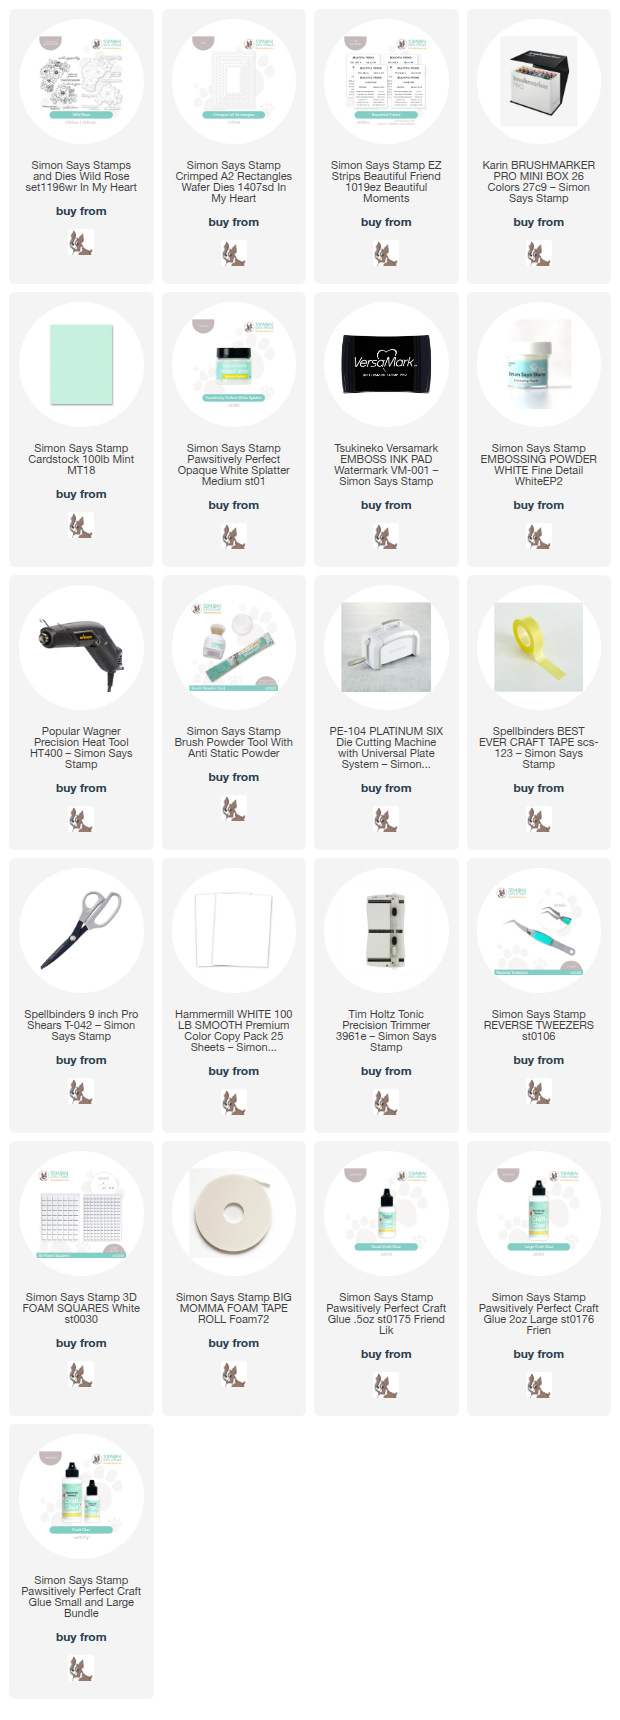
Cardmaking Supplies Used:
Here are the supplies I used to create today’s messy watercolor wild rose card.
Many of the links below are compensated affiliate links. This means if you click through and make a purchase, I may receive a small commission at no additional cost to you.
These commissions help support my website and allow me to continue sharing cardmaking tutorials, videos, and inspiration. I truly appreciate your support.
All products were personally purchased unless otherwise noted. Simon Says Stamp In My Heart products were provided by the company for design purposes.
You can find my full affiliate disclosure on my disclosure page.
Click the icons below each product to shop my favorite stores.
Let’s Connect & Get Inspired
Follow along for more cardmaking ideas, techniques, and tutorials:
- Follow me on Instagram
- Join 38,800+ creatives on Pinterest
- Subscribe to my YouTube Channel
- Follow me on Facebook
- Join my Cardmaking Obsession Facebook Group
FREE Cardmaking Tutorials Library
Looking for more inspiration? Explore my FREE PDF GALLERY with 359+ cardmaking tutorials — packed with ideas, techniques, and step-by-step projects to spark your creativity.

Don’t Miss This Week’s Deals
Lot’s of great paper crafting sales and new releases happening now — check them out here!

Shop My Favorite Craft Brands
Browse my Go to Brands and supplies using my affiliate links.
Another lovely card Sandi! I like the Mint cs & the watercolor is so pretty!
thank you Donna, I love this soft mint color cardstock
Oh my goodness, that’s stunning Sandi! The colors of your flowers are perfect, love the stamping on the background too! 🙂
Thanks so much Amy, it’s fun to relax and watercolor some days
Lovely soft card and some great “Pro Tips”. I forget about white heat embossing, but what a beautiful use of this technique.
Thank you Gayle, I’m so glad you like it
Gorgeous! I love that pretty sage green background and your watercolouring is amazing!
thank you Lisa, I’m having fun trying new color combos