
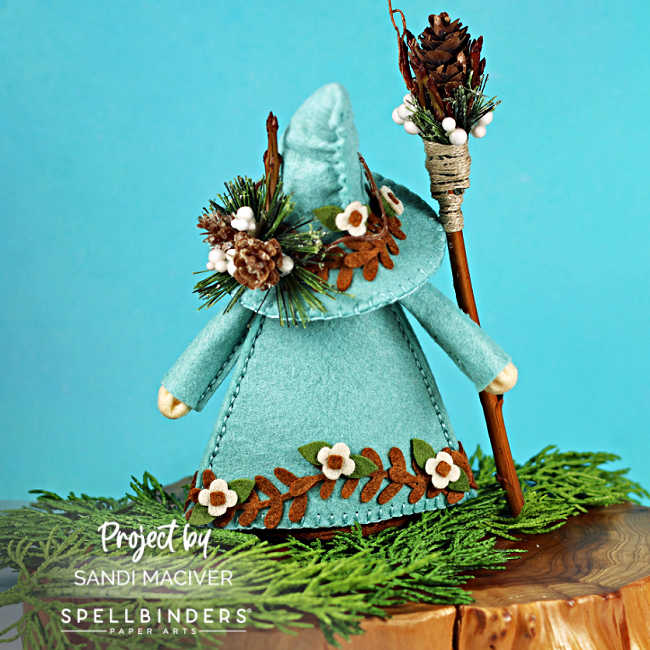
Hi crafty friends! Welcome back to my blog. Today, I’m thrilled to introduce you to Woodlands Fergus the Gnome – the newest (and cutest!) addition to our holiday decor. I’ve been happily stitching away for days to bring this little forest fellow to life. He’s dressed to match our woodsy, earthy Christmas theme perfectly….think bottle brush trees, vintage Santas, a sprinkle of nature – and now, one very distinguished gnome.
And because I can never resist teal (ever!), Fergus is sporting a soft woodland aqua coat with cozy brown accents. He likes to blend into the forest….but also stand out just a little – a Gnome has to have style, right!
I’ll share his basic decorating details below, because you may remember I filmed a full video series for Spellbinders back in September, showing how to stitch Fergus from head to toe ( or beard to boots!). Be sure to scroll to the end of the post – I’ve linked his traditional Christmas cousin and his Winter Snowflake sibling too. Gnomes come in families after all!.
Card-making product affiliate links are used throughout this post at no additional cost to you. Your support enables me to continue providing you with content, and I genuinely appreciate your support!

Products used for Woodlands Fergus the Gnome – Spellbinders Felt Stitching Project.

How to decorate Woodlands Fergus the Gnome
1 – Stitch the main pieces.
Begin by stitching together the hat, coat, and body using the light teal and brown felt. Once assembled, attach Fergus’s fluffy white beard and round little nose to the front of the body.
Using the two embellishment die sets, cut the flowers from off-white felt, the branches and flower centers from dark brown felt, and the leaves from moss green.
Start decorating Woodlands Fergus by adding a trim of brown branch pieces along the hat where the brim meets the top, and continue the same branch detail all the way around his coat.

2 – Add the Woodland Feel:
Next, Bailey (our mischievous 5 month-old Corgi assistant) and I set off on a very important mission…..straight into the backyard wilderness! We foraged for tiny pinecones, and snipped the tips of a few tree branches and bushes – all in the name of gnome decor, of course. Fergus’s magical staff is actually crafted from a sturdy little branch we gathered on our adventures.
Bailey enthusiastically approved of the project….mostly because if Mom gets to tear apart the bushes, then clearly she should get a turn too! Gnomebody told her she couldn’t help, haha

This is our sweet little girl last week, proudly celebrating her newest milestone – finally mastering the art of jumping onto the couch all by herself! She is absolutely bursting with pride…and yes, we were cheering right along with her, LOL

Here’s a close-up of Fergus’s hat, decked out with tiny pinecones, frosted greenery, and little white berries. I snipped the greenery from a store-bought garland, and the berries came from a Christmas floral pick. The front, back, and other side are finished with layered felt flowers that I die-cut and glued together for the perfect woodland touch.
3 – Finish the coat.
Once the glue has dried from attaching all the brown branch trims to the coat, embellish with the felt flowers – three across the back and one on each front panel for a balanced woodland look.
4 – Create the Staff:
As mentioned earlier, I snipped a thicker branch from the backyard to become Fergus’s trusty woodland staff. First I glued a few smaller branch tips around the top and let them dry completely. Then came the faux greenery – and a friendly reminder: patience is your crafting buddy here! If you rush, you’ll end up with a sticky situation, ask me how I know, LOL.
Once dry, press a tiny pinecone into the center of the branch cluster and secure it with glue. Finish by adding a few white berries to fill in any little gaps. – it’s all about that enchanted forest charm.
When everything is fully set, add a line of glue at the base and wrap it neatly with jute twine, securing the end with a final dab of glue. This will secure everything to the top of the staff for you.

and here is the sweet side view of our little Woodlands Fergus.

As promised – here’s the traditional Christmas Fergus, all decked out in his festive red-and-green finery and ready to spread holiday cheer! Wouldn’t he look adorable in your holiday tiered tray?
 The back of Christmas Fergus shows off his festive felt coat and hat, both detailed with stitched trim and bright poinsettias, holly leaves, and tiny flowers — a cheerful holiday flourish from every angle.

And finally, meet Snowflake Fergus – all bundled up for the chilly winter and sparkling with colorful snowflake decorations, ready to bring a little frosty fun to the season!

The backside of Snowflake Fergus offers the perfect canvas to pile on those frosty, felt snowflakes! I added colorful buttons to the centers for a little extra pop – because every winter needs a touch of playful sparkle.
You still have plenty of time to whip up your own Woodland, Christmas, or Snowflake Fergus for the holidays! Below, you’ll find a full supply list for everything I used….well, almost everything, The pinecones and twigs were foraged straight from my backyard, lol. If you need help gathering nature treasures, feel free to come and borrow Bailey – she has enough energy to power the entire craft room, and this old gal could use the break, LOL!
and you can find all the Videos to create FERGUS – HERE

Card Making Supplies used for the Simon Says Stamp Lifting hearts card:
Here are the products I used today. Compensated affiliate links used were available at no cost to you.
Clicking on a thumbnail link and shopping provides me with a small commission (at no additional cost to you), which supports my website and allows me to continue bringing you new projects and videos. I appreciate your support. Affiliate and product disclosures are found on my disclosure page. All products were personally purchased except for Spellbinders Monthly Club Kits, which were provided/sponsored by the company. I only use and recommend products I love. Click on the icons below each product picture to visit my favorite stores.


-
-
- Follow me on INSTAGRAM
- Join 38,800+ following me on PINTEREST
- Subscribe to my YOUTUBE Channel
- Follow me on FACEBOOK
- JOIN my STAMP OBSESSION Facebook Group
- Check out my FREE PDF Gallery for over 350+ Card Making Tutorials
- How to make a SLIMLINE CARD – Info PAGE
- Do you like to stitch on cards? Then join our NEW FACEBOOK GROUP
-

– LOTS of great Paper Crafting Sales and New Releases going on this week – Check them out here

Sandi your gorgeous Gnomes are so delightful.
Oh my goodness, those are so cute! Love the little gnomes. Such a fun idea! 🙂
Fantastic post, Sandi! Love all the gnomes, they really are works of art!
Last but not least , thanks for the pics of Bailey! She is such a sweetheart!
The expression on her face says it all – ready for mischief!
haha, thanks Sharon, I posted Bailey for you, LOL, and yes, she is definitely ready for mischief, all day long every day.
Those little gnomes are so very cute!!! Well done!! Happy holidays!!!
I love Fergus! I just made my first one for a young lady celebrating 19yrs after a heart transplant. I can’t wait to make more of him.
Very cute Sandy! You are very creative!
Sorry I spelled your name wrong I apologize!
your woodland Fergus is absolutely fabulous Sandi and I love how Bailey went foraging with you for extra bits!!! and RIP couch lol
adorable, all of them, gnomes and puppy!
thank you Lynne
Isn’t that what puppies do, make mischief!!!
yep, all the time, LOL